WordPress Publish Posts via Email Tutorial
How to publish posts via email in WordPress
WordPress has a functionality that allows you to add and publish posts via email. Messages received in the inbox of the email address that you've set up for that purpose will be added as posts in your WordPress. Depending on the address of the sender these messages will be either published directly on the frontend, or they will be added in the admin panel with a pending status. If the email address of the sender matches the address of a registered WordPress user that has the permissions to publish posts, the email messages sent from such an address will be published directly on the frontend. The other messages will be added only in the admin panel as pending posts that have to be approved before being displayed on the frontend.
Publishing posts from the admin panel is, of course, the most reliable method and the one that gives you the full set of options in editing the posts, but if for some reason you need to do it via email you can test this function and make use of it.
First, we'll outline the things that you need to do to make this work, and then we'll go over each aspect in more details.
- You need a separate email account that's intended for the sole purpose of publishing posts. Make sure you don't use this email for anything else because all messages that are in its inbox will be published as posts in your WordPress.
- You need to configure some options that are in the admin panel of your WordPress. These options are located in Settings menu>Writing sub-menu. The relevant settings on that page are grouped into a section labeled Post via e-mail.
- In order to download the messages from the inbox and publish them on your WordPress site you need to periodically execute the wp-mail.php file that's in the root WordPress directory on your hosting account. There are a few ways you can do this. One way is to do it manually by opening with your web-browser the URL address corresponding to the location of the file on your account. If you want to make the process automatic, you can do this by either inserting some code in the footer.php file of your current theme or by setting up a cron job that executes the wp-mail.php file.
Now we'll explain everything in more details. We'll start with the email account and the settings in the WordPress admin panel, and then we'll go over the different methods for executing the wp-mail.php file.
Email Account
First, you need an email account that will be used for publishing posts. All messages received in its inbox will be added as posts in your WordPress. For this reason you shouldn't use this email address for any correspondence and you shouldn't make it public or known to anybody that you don't want to be able to publish posts via this email. It's a good idea to use a random string for the username of the address; something that cannot be guessed easily.
It's also recommended that you use an email address that's created from your hosting account; one that has your domain name in it (e.g. username@yourdomain.com). HostKnox clients can create email accounts from the Email section of the HostKnox control panel. For more information on this check out the tutorial on how to create and manage mailboxes.
As we mentioned, regardless of the address of the sender emails received at the address that you have set up for publishing posts will be added in the admin panel of your WordPress as posts. If the email address of the sender matches the email address of one of the registered WordPress users and that user is allowed to publish posts (e.g. admins, editors), then the post will be published and visible on the frontend. Otherwise, the post will be created but it will have a Pending status and thus has to be approved so that it's visible on the frontend. If you need more information on registered users and user roles read the tutorial on how to manage users and user roles in WordPress.
It's not a good idea to publish posts via an email address created from one of the web-based email services like Yahoo, Hotmail and Gmail. With some of these you may have troubles logging into your email account through WordPress. With Gmail, for example, you'll find this doesn't really work. With others like Hotmail you have to make sure that the connection is established through SSL/TLS (encryption protocols), otherwise it won't work. Check the next section in this tutorial to learn how to connect to your email account through WordPress.
Email Options in the Admin Panel
In order for WordPress to be able to connect to the email account that you've created for publishing posts you need to configure some options in the admin panel. After you log in go to Settings menu>Writing sub-menu. On the page that opens there's a group of options labeled Post via e-mail:
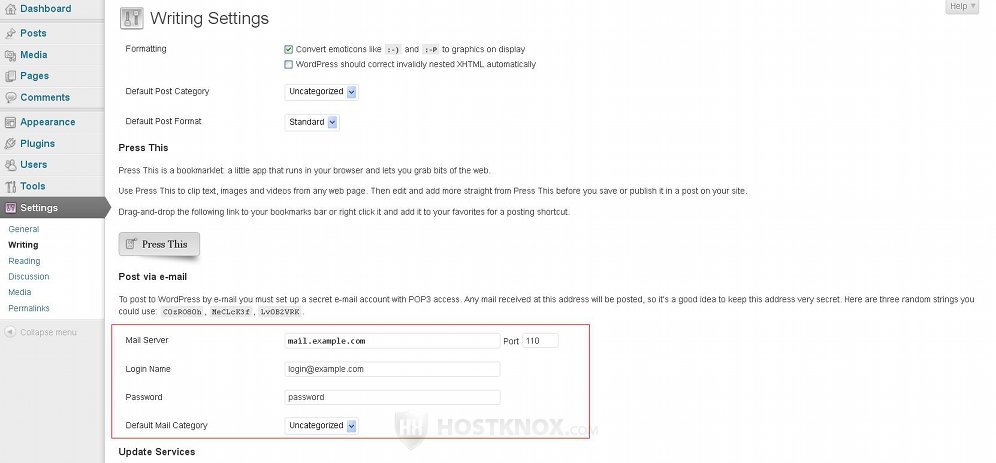
Let's review the options:
- Mail Server - in this field you have to type the URL address of the POP mail server. For HostKnox clients this means typing just the URL of the server on which the account is hosted (e.g. e.hostknox.com). This will work for a connection without any encryption. If you want to use encryption, put ssl:// at the beginning of the URL address (e.g. ssl://e.hostknox.com). If you decide to use a mail account with a web-based mail service (e.g. Yahoo, Gmail, Hotmail) even though it's not recommended, check the tutorial on how to configure an email client to connect to web-based mails for more details on the URLs of the POP servers of the most popular web-based email solutions.
- Port - by default this is set to 110. This is the correct POP port number for a connection without encryption. If you want to connect using SSL/TLS, change the port number to 995. Don't forget that in this case you also have to put ssl:// in front of the URL address in the Mail Server field (e.g. ssl://e.hostknox.com).
- Login Name - in this field type the full email address (e.g. username@yourdomain.com). Don't type just the user name without the domain part of the address.
- Password - type the password of the email account.
- Default Mail Category - by default, this is set to Uncategorized which is the only preconfigured category that comes with WordPress. This is the category to which posts published via email are automatically assigned. You can change it with any of the categories that you've created.
After you're done with the settings don't forget to click on the Save Changes button at the bottom of the page.
Downloading and Publishing Email Messages as Posts
The emails that are in the inbox of the email account that you've created are downloaded to your WordPress and added as posts with the help of a file called wp-mail.php. More precisely, when the wp-mail.php file is executed, the email address is checked and if there are any messages, they are downloaded and published as posts. The file itself comes with WordPress and is located in the root WordPress folder on your WordPress hosting account.
There are a few ways you can execute wp-mail.php. Here we'll suggest three ways. It's up to you to decide which one to use. You should also take into account how often you publish posts via email. If it's not something that you do regularly, or the other methods seem too complicated to you, then perhaps the manual method will be the most convenient for you.
- You can manually execute the wp-mail.php file by opening with your web-browser the URL address corresponding to the location of the file on your hosting account. If, for example, your WordPress is installed directly in the public_html directory on your hosting account, making the homepage accessible at yourdomain.com, then the path to file on the account will be public_html/wp-mail.php. This means that you have to open the URL address yourdomain.com/wp-mail.php with your web-browser. If you have configured the email options from the Settings>Writing screen of the admin panel correctly, the messages will be downloaded from the email account and published as posts.
The other two ways are automatic. If you publish posts via email more often or you just want the process to be automatic, one of these two methods will probably work better for you.
- One way to automatically execute the wp-mail.php file is by inserting some code in the footer.php file of the currently active theme. Assuming that WordPress is installed directly in the public_html folder on your hosting account, the path to the file will be public_html/wp-content/themes/name-of-theme/footer.php (of course, you need to replace name-of-theme with the actual name). On a new line somewhere in the middle of the file's content insert the following code:
<iframe src="http://yourdomain.com/wp-mail.php" name="mailiframe" width="0"
height="0" frameborder="0" scrolling="no" title=""></iframe>
In that code you need to replace http://yourdomain.com/wp-mail.php with the actual URL address of your wp-mail.php file.
In order to download the email messages and publish them as posts you need to open/refresh the frontend of your site. This, of course, means that this method is not entirely automatic.
There are also a couple of downsides. One is that if you change the currently active theme with another one, you have to edit the footer.php file of that theme as well. Another disadvantage is that when you upgrade the theme the file will be overwritten and the change will be lost, so you have to make it again. In this case you can avoid this by using a child theme. You can create a child theme, make it the active one, copy the footer.php file into the folder of the child theme and make the change to that file. For more information on child themes read the tutorial on how to create a child theme in WordPress.
You can avoid these problems by using the other automatic method for executing wp-mail.php.
- Another method for automatically executing wp-mail.php, one that will save you some of the troubles with the previous method, is to add a cron job that executes periodically the wp-mail.php file.
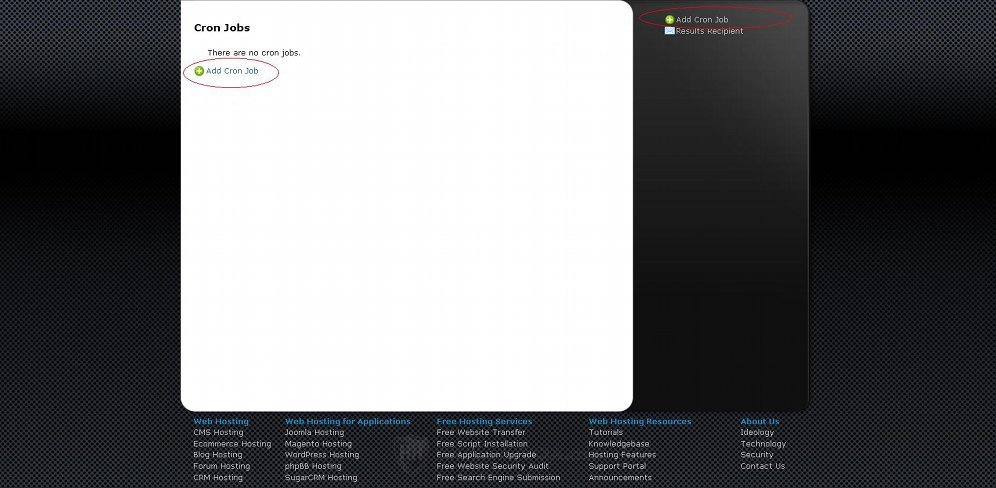
HostKnox clients can add cron jobs from the Cron Jobs section of the HostKnox control panel. Once you log in and you access the cron jobs section click on the Add Cron Job button:
On the next page from the Frequency drop-down menu select how often you want the file to be executed, type the command in the respective field and click on the Add Cron Job button that's under the settings:
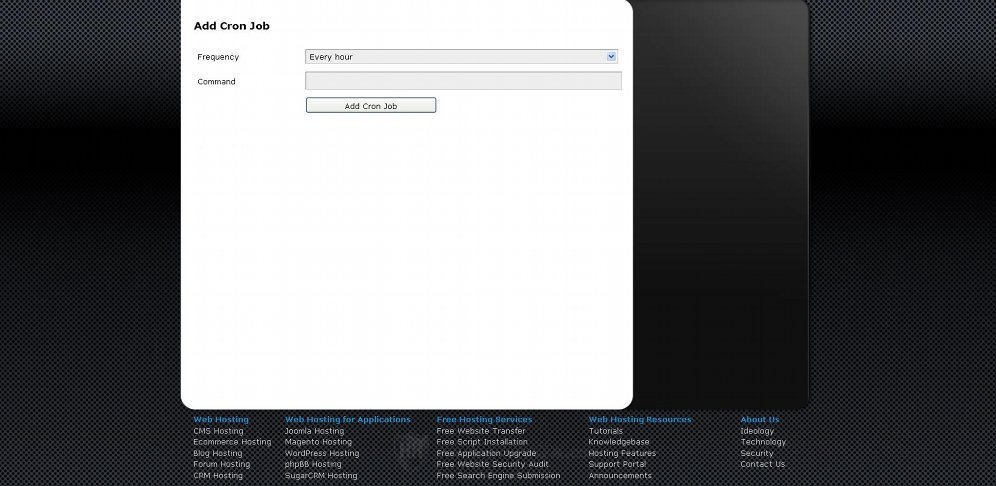
The command that you need to put in the Command field is php -f followed by the full path to the wp-mail.php file on your hosting account. So if your WordPress is installed directly in the public_html folder on your hosting account, the full command will look like this:
php -f /home/username/public_html/wp-mail.php
You have to replace username with the actual username of your hosting account. Of course, this path will work for HostKnox clients. Those that use other hosting companies will probably have a different path to the public_html (or www) folder.
Cron jobs can also be configured via SSH.