WordPress Media Files Tutorial
How to add and edit media files in WordPress
In WordPress there's a media library with which you can add, edit and manage media files. The images or links to other media files can be inserted into posts or added on static pages and displayed on the frontend.
For basic information on the media library read the tutorial on managing the media library in WordPress. In this tutorial we'll concentrate on the process of adding and editing media files through the media library and on all the settings available on the add/edit form.
As an example we'll add and edit a picture since images are the most used media type. Besides, when editing images there are more settings that can be configured as opposed to the ones available when editing other media types (audio, video, text files, etc.). So in this way we can review all settings.
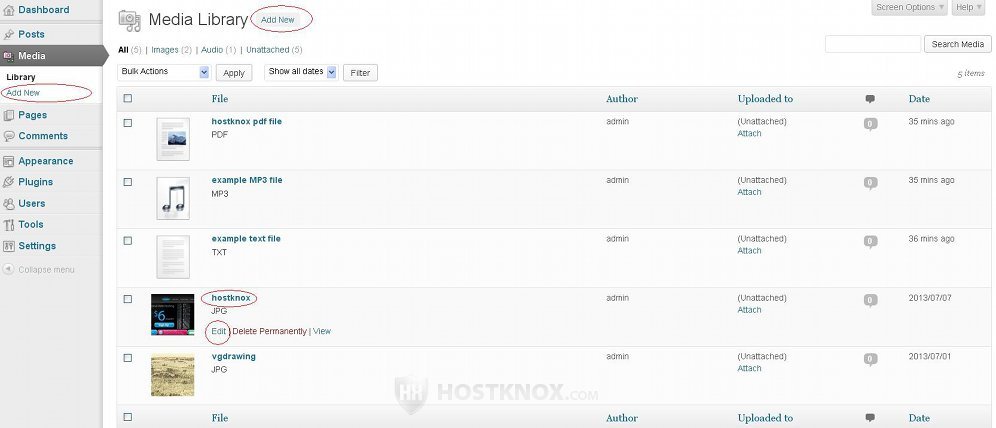
To add files in the media library or to edit existing ones, log in to the admin panel of your WordPress and go to Media menu>Library sub-menu. On the page that opens there's a table with the uploaded media files. To add a new file click on one of the two Add New buttons. There's one in the upper left corner of the page and another one in the menu on the left. To edit a file click either on its name in the table or hover the mouse cursor over its row in the table and click on the Edit button that appears:
We'll start with the add form. The edit form is different and it has more settings.
Adding Media Files
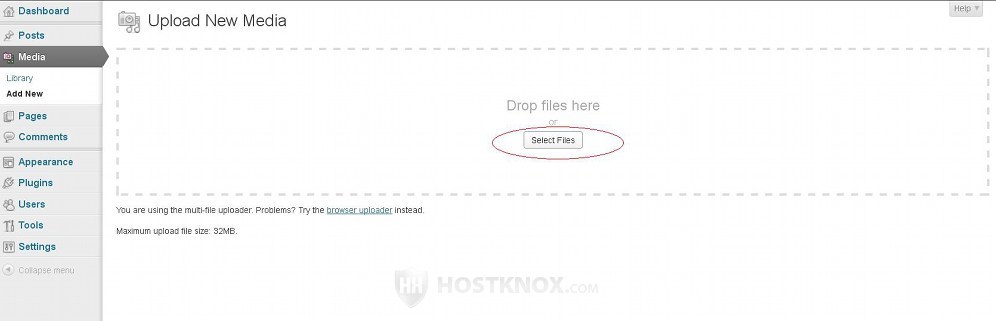
Once you click on the Add New button that's in the media library, the page for uploading files will open. There are two built-in uploaders: a multi-file uploader and a browser uploader. On the add form the multi-file uploader is displayed by default. To add one or more files just click on the Select Files button:
After you click on the button a window will pop out from which you can select one or more files from you local computer. To select more than one file press and hold the Ctrl button on your keyboard and click on each of the files with the left mouse button. After the files are uploaded they will be listed on the same page. Next to each file you'll see an Edit button with which you can edit its settings:

You can use the button to edit the file right after uploading it, or you can do that later at any time from the media library. As described at the beginning of this tutorial you can do that by clicking on the name of the file in the table that lists the existing files, or you can click on the Edit button in its table row.
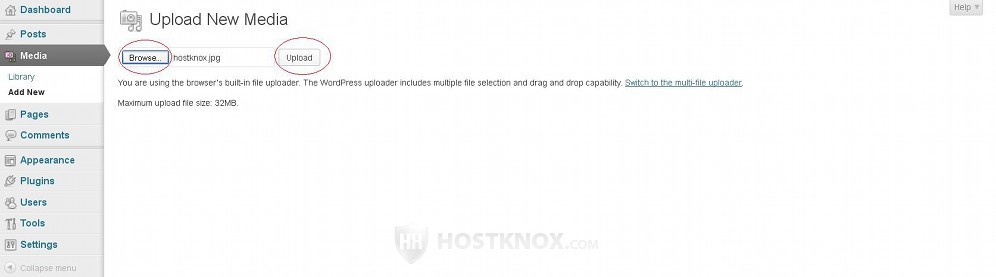
As we mentioned, there's another uploader called a browser uploader. If for some reason you have problems with the multi-file uploader, or you just want to use the browser uploader, click on the browser uploader link:

This will open the browser uploader page. Click on the Browse button that's on the page, select the file that you want to upload from the window that pops out, then click on the Upload button:
With the browser uploader you can upload one file at time. After the file is uploaded you'll be automatically redirected to the media library page (the one with the table listing the uploaded files).
Editing Media Files
You can edit an uploaded media file by going to Media menu>Library sub-menu in the admin panel and clicking on the name of the file in the table there, or you can click on the Edit button that appears under the name when you hover the mouse pointer over the row in the table. When adding a new file with the multi-file uploader as explained in the previous section of this tutorial, you can edit the file right after it's uploaded by clicking on the Edit button that appears on the uploader page.
The settings that are available on the edit form depend on the file type. Images have the widest variety of settings so as an example we'll review the edit form of an uploaded image. To be able to use and display the file in posts and on static pages you don't need to configure or change these settings, but they might come in useful in particular cases.
At the top of the edit page is the title of the file. Note that this is not the full file name of the uploaded file. If you haven't edited the title, WordPress automatically uses the file name but without the file extension (e.g. .jpg, .mp3, .txt, etc). If the file is an image, right under the title field you'll see the actual image:
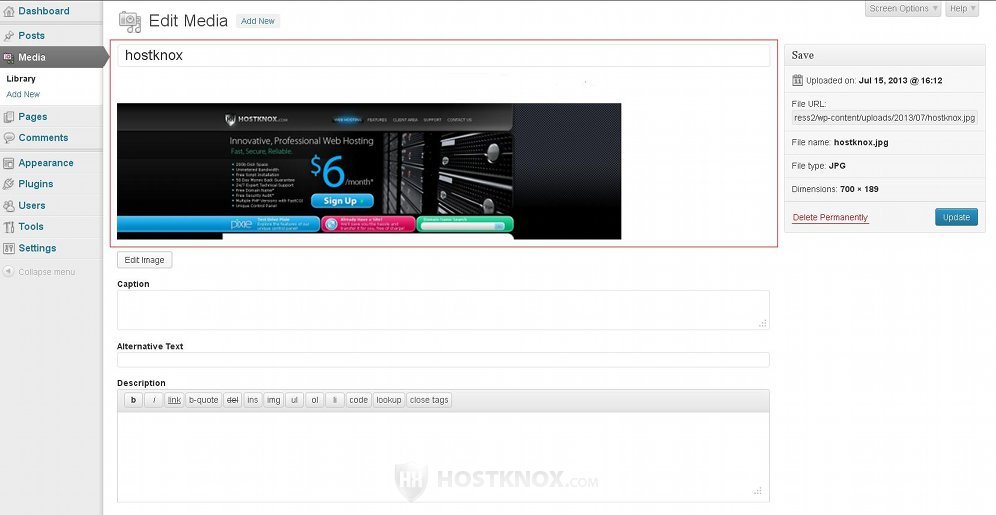
On the right side of the title field is a block labeled Save. It contains some basic information about the file such as the date and time it was uploaded, the URL of the file, the whole file name (e.g. hostknox.jpg), the file type, and if it's an image, its original dimensions:

The most important thing is that in this block is the button Update with which you can save the changes made to any of the settings. There's also a button Delete Permanently with which you can delete the file.
Keep in mind that the file URL and the permalink of the file are different things. The file URL corresponds to the location of the file on your hosting account. So if the WordPress application is installed directly in the public_html directory of your WordPress hosting account, it will have the form yourdomain.com/wp-content/uploads/year/month/file-name. This URL will display just the image (if the file is a picture) without the design of the site itself; the image is usually shown simply on some gray background.
The permalink is the URL of the page of the file. It has the form yourdomain.com/?attachment_id=10 (that's in case you don't use pretty permalinks). This is the attachment page on the site that displays the image or a link to the file if it's not an image (the link itself is actually the file URL). Note that this is not the page of the post or the static page on which the file is displayed together with the content of the particular post or static page. On the file attachment page the image/link to the file is shown without the content of the post/static page to which the file belongs. You'll get a better idea when you test the various URLs yourself.
The settings at the bottom of the edit form are Caption, Alternative Text and Description:
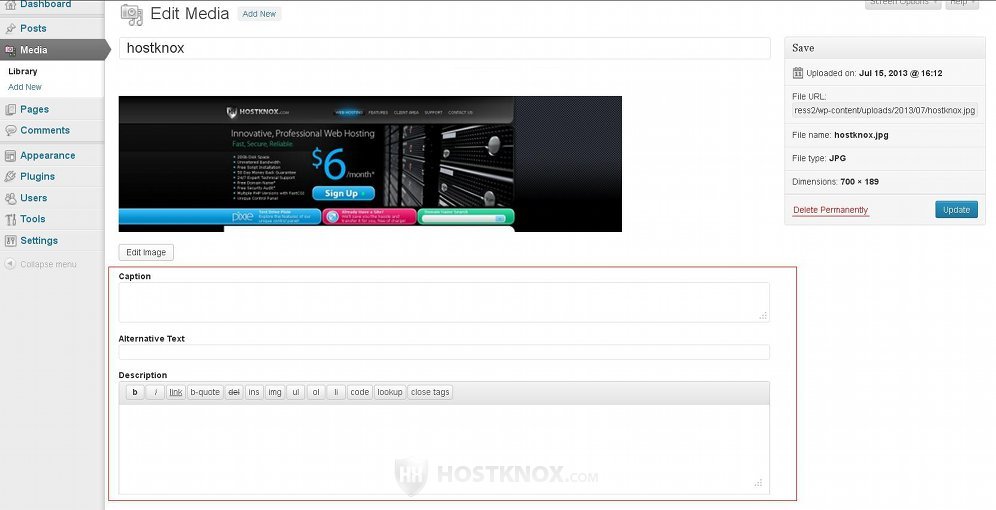
The Alternative Text option is only present on the edit form of images, while the ones for the caption and description are available on the edit forms for other media formats as well. You're not required to type anything in these text fields. If you type something in the field Caption, it will be shown on the frontend centered under the image on the attachment page of the image. It will also be shown under the image in the posts in which the image is included, as well as on static pages (if it's included in any).
The text that you type in the field for Alternative Text is shown on the frontend instead of the image only when for some reason the image cannot be displayed. If you haven't typed an alternative text but you have typed a caption, the caption will be shown as an alternative text.
You can use the built-in text editor for the Description to type some short description of the media file. Unlike the caption, the description is shown under the file only on its attachment page and not in posts and on static pages. It's shown both under images and under the links for other media formats.
On the edit form for all media formats you can add a few blocks with settings that are hidden by default. To do this click on the Screen Options button in the upper right corner of the edit page. This will expand a small panel with a few checkboxes: Discussion, Comments, Slug, Author.
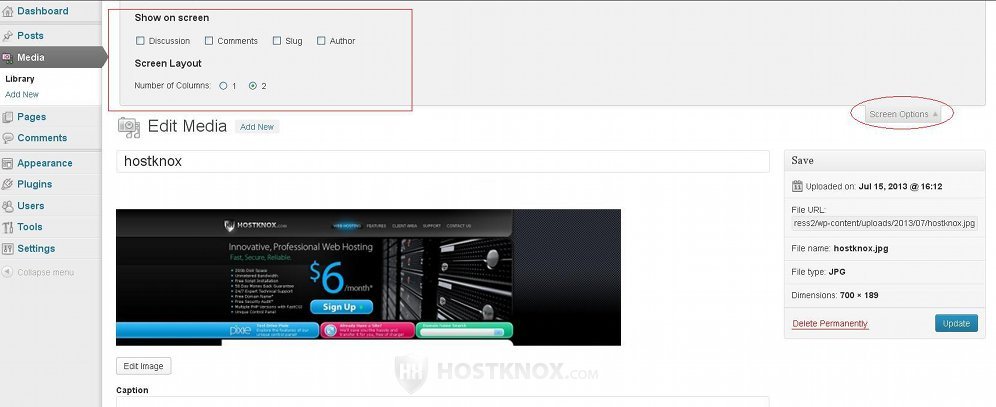
To make a block visible mark its checkbox. Each block contains some settings related to the media file:

From the Discussion block you can enable/disable comments and trackbacks and pingbacks. By default, both settings are enabled. This affects only the file attachment page (e.g. yourdomain.com/?attachment_id=10). So, for example, if you disable comments, visitors will not be able to submit comments on the file attachment page, but if the file is included in a post, this will not affect the post page.
The Comments block lists all comments submitted for the file from the file attachment page. When you hover the mouse cursor over a comment in the block some action buttons will appear with which you can approve/unapprove the comment, edit it, delete it, etc.
In the Slug block there's a text field in which you can change the slug for the file attachment page. WordPress automatically uses the name of the file as the slug. It turns uppercase letters into lowercase ones and it puts hyphens between the words (if more than one); so, for example, if the title of the file is WordPress Hosting from Hostknox, the automatic slug will be wordpress-hosting-from-hostknox. You can change the slug to anything you want. Slugs are used only when pretty permalinks are enabled. As we already mentioned the default URL of a file attachment page has the form yourdomain.com/?attachment_id=21. With pretty permalinks, depending on the URL structure that you choose, the file attachment page can have an URL of the form yourdomain.com/post-name/file-name. Note that even with pretty permalinks enabled, the file attachment page will have a pretty permalink only if it's attached to a post or a static page. For more information on permalinks check out the tutorial on WordPress permalinks.
From the Author block you can change the author/user attributed with uploading the file.
Cropping, Scaling, Flipping and Rotating Images
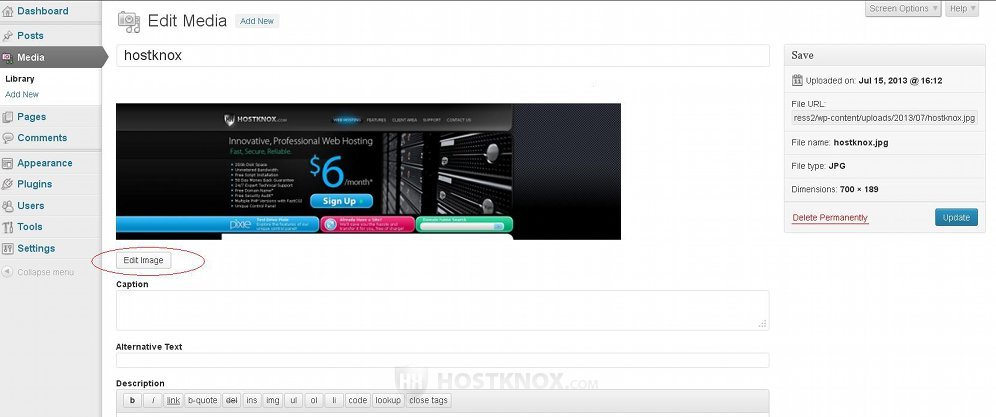
When the file that you're editing is an image, you can also rotate and flip it, crop and/or scale it. To do this click on the Edit Image button that's right under the image on the edit form page:
This will display several additional buttons above the image and a few blocks on the right side of the image:
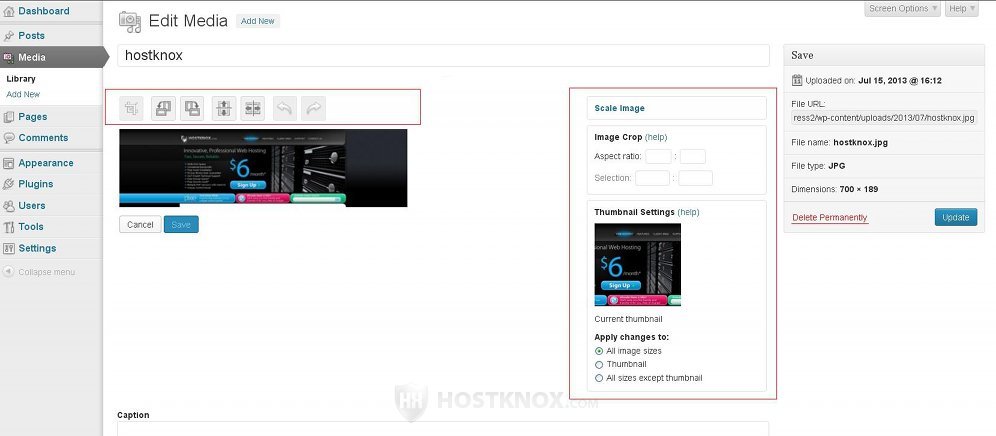
With the buttons you can rotate the image clockwise and counter-clockwise, you can flip it vertically or horizontally, and there's also a button to redo the last action and another one to undo it. One of the blocks has options with which you can scale the image, another one has options which will help you when cropping the image, and from the last one you can choose whether the changes should apply to all image size, just to the thumbnail size, or to all sizes except the thumbnail.
If you crop, scale, flip or perform any of the actions with these settings, the change will be immediately reflected on the frontend on the file attachment page. However, if the image was inserted before the change into a post or on a static page, the change will not be reflected there. If you want the change to be visible in those old posts, you have to edit the posts and insert the newly changed image.
To crop the image hover the mouse cursor over the image, click and hold the left mouse button, drag the mouse and highlight the area of the image that you want to be left intact after the cropping. The selected area will also be marked in the Image Crop panel on the right. If you want to, you can put specific numbers for the selection:
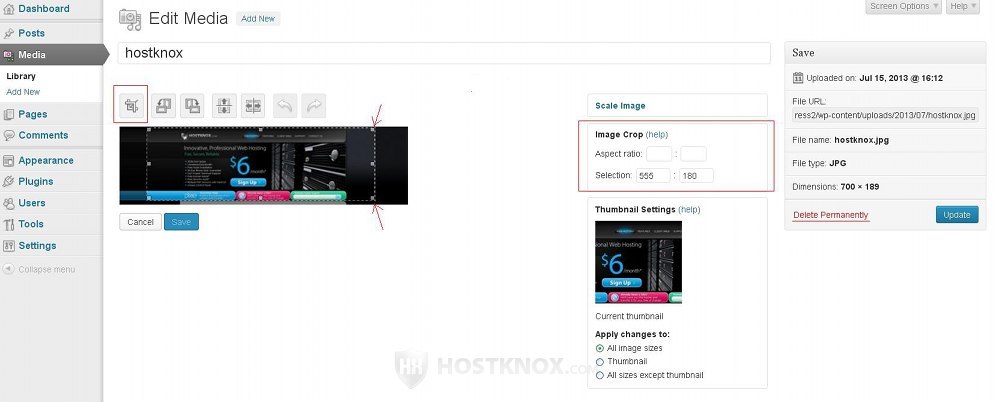
After that click on the Crop button that's above the image.
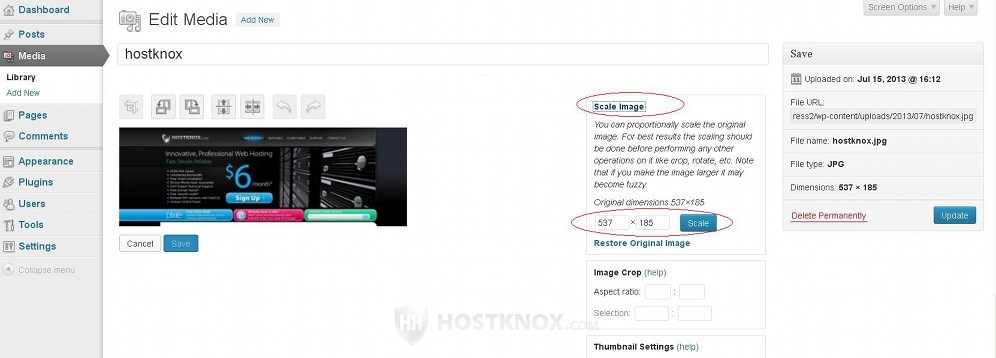
To scale the image click on the Scale Image button on the right to expand the panel. Input the dimensions in the respective fields and click on the Scale button:
After you make any change to the image don't forget to click on the Save button that's just below the image (or on the Cancel button if you don't want to keep the change).
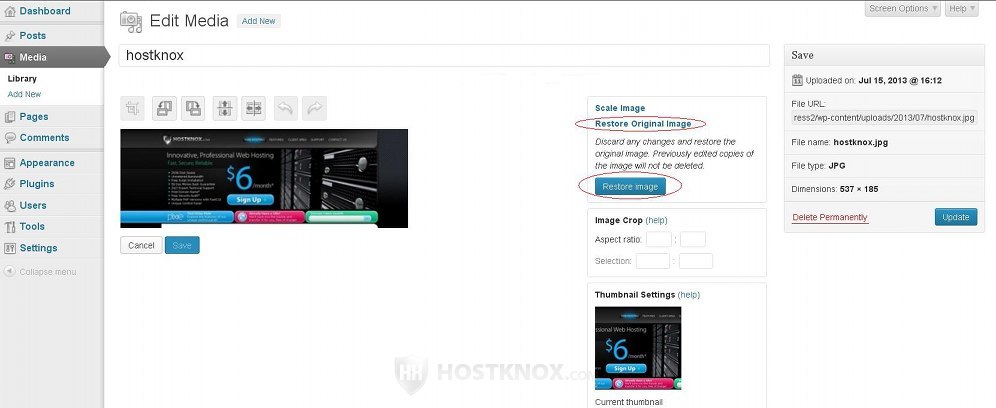
Once the image has been modified a button Restore Original Image will appear on the right side of the image. If you want to remove all changes and restore the original image, click on it to expand a panel, and click on the Restore Image button that's in the panel:
If you make any changes, to the image itself or to any of the other settings on the edit form don't forget to click on the Update button in the Save block on the right.