WordPress Multisite Tutorial
How to set up a WordPress multisite
WordPress is suitable for creating and configuring a multisite. With this feature you can use a single WordPress installation for more than one site/blog. In this tutorial we'll describe the steps that you need to follow in order to create a WordPress multisite.
Before you start the actual multisite setup there are a few things that you need to perform or consider:
- Create a backup of the WordPress files and the database used by the application. You can back up the files by downloading them with an FTP client and you can back up the database using phpMyAdmin. For more information read the tutorial on how to back up your site. If you're going to use a new WordPress installation and you don't have anything to lose, you don't need to make a backup.
- If you have any plugins installed, disable them before you start the setup process. You can do this from the Plugins section of the admin panel.
- You can set up the multisite to use either subdirectories or subdomains of the main site. For example, if the URL of your main site is yourdomain.com, with subdirectories the sites that you'll add will have URLs such as yourdomain.com/site1, yourdomain.com/example, etc. If you decide to use subdomains, the sites that you'll add will have URLs such as site1.yourdomain.com, example.yourdomain.com, etc.
- If you want to set up your multisite to use subdomains, your WordPress installation should be in the root web-accessible directory on your hosting account. This means that it should be installed directly in the public_html directory on your WordPress hosting account, which in turn means that the URL of your site is yourdomain.com. If your WordPress is installed in subfolder on your hosting account (e.g. public_html/wordpress), then you can set this installation only to use subdirectories for your multisite (e.g. yourdomain.com/wordpress/site1, yourdomain.com/wordpress/site2, etc.).
- Another thing that should be mentioned when setting up a multisite with subdomains is that the hosting account on which WordPress is installed should be configured to use wildcard subdomains. All HostKnox clients are provided with this function.
- In case you want your sites in the multisite to have separate domains (e.g. site1.com, site2.com, etc.) you have to use an additional domain mapping plugin to do this. You can install, configure and use the plugin once you complete the multisite setup. You can use the plugin both with a subdirectory multisite and with a subdomain multisite to map the URLs of sites in the multisite to separate domains. For more information on how to install, configure and use the plugin read the tutorial on how to manage domain mapping in WordPress multisite. But first you have to configure the actual multisite.
Whether you're going to use subdirectories or subdomains the setup process is practically the same. There are only slight differences in the code that has to be inserted in the wp-config.php and .htaccess files of the WordPress installation. We'll come to this further down in the tutorial.
Activating the WordPress Multisite Function
The first thing that you have to do to start configuring WordPress multisite is to activate the multisite function. To do this you have to put the following code in the wp-config.php file of your WordPress:
define('WP_ALLOW_MULTISITE', true);
The wp-config.php file is located in the root WordPress folder on your hosting account. So if your WordPress is installed directly in the public_html folder on your account, the path to the file will be public_html/wp-config.php. You can edit the file from the Files section of the HostKnox control panel. Another way to do it is to download the file on your local computer with an FTP client (e.g. FileZilla), edit it with a text editor (e.g. Notepad, Wordpad) and upload it back overwriting the old file.
Make sure that the above mentioned line is inserted above the line:
/* That's all, stop editing! Happy blogging. */
in the wp-config.php file.
Multisite Setup Options in the Admin Panel
Once you insert in the wp-config.php file the code for enabling the multisite function refresh/log into the admin panel of your WordPress. There will be a new submenu for setting up your multisite. Just go to Tools menu>Network Setup sub-menu and on the page that opens you'll see a few options:
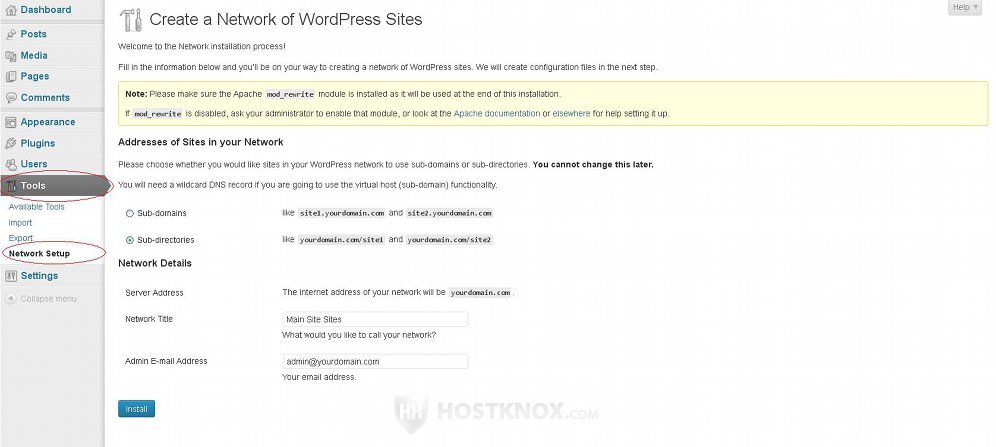
These options are:
- Sub-domains and Sub-directories - using these two radio buttons you can choose whether you want your multisite to use subdomains or subdirectories. Just mark the respective radio button. Next it you can see examples of the what the URLs of the sites that you add in the multisite will look like.
- Server Address - this option cannot be changed. It automatically shows the URL address of the frontend of your WordPress installation (e.g. yourdomain.com).
- Network Title - this field is filled up automatically. By default, the name of the network consists of the title of your site (that name is first set up when you install WordPress) plus the word Sites. You can change the name to anything you want. The network name is used in the admin panel/network admin panel; it's not shown on the frontend.
- Admin E-mail Address - that's the email address for the administrator of the whole multisite network. By default, it's set to the admin email address of the admin user that was created during the installation of your WordPress application. That will be the email address for the super admin; that's the user that has access to the network admin panel and to the admin panels of all sites in the network. After you set up the network you can create admins for each site that you add in the network; admins that don't have access to the network admin panel but just to the admin panel for the particular site.
After you're done with the options click on the Install button.
On the following page you'll see displayed two pieces of code. The first part has to be inserted into the wp-config.php file of your WordPress installation and in the bottom text area you'll see some rewrite rules that have to be put in the .htaccess file of the installation. There are actually instructions on the page informing what you have to do:

Now let's review the changes that have to be performed to the wp-config.php file and to the .htaccess file.
Modifications to wp-config.php
The code in the wp-config.php file has to be inserted above the line /* That's all, stop editing! Happy blogging. */. You can put it just below the line that you inserted for activating the multisite function (e.g. define('WP_ALLOW_MULTISITE', true);). In our example the code that has to be put in wp-config.php is for a multisite with subdirectories and it looks like this:
define('MULTISITE', true);
define('SUBDOMAIN_INSTALL', false);
define('DOMAIN_CURRENT_SITE', 'yourdomain.com');
define('PATH_CURRENT_SITE', '/');
define('SITE_ID_CURRENT_SITE', 1);
define('BLOG_ID_CURRENT_SITE', 1);
Of course, yourdomain.com in the third line should be replaced with your actual domain name. The code that is used for a multisite with subdomains is almost the same. The only difference is that the line define('SUBDOMAIN_INSTALL', false); is set to true. The only other possible difference is that if the installation that you're going to use for a multiside with subdirectories is installed in a subfolder on your hosting account, then the line define('PATH_CURRENT_SITE', '/'); will specify the actual path to the installation on the hosting account in relation to the document root folder (e.g. public_html). In our example, the installation that we're going to use for a multisite with subdirectories is directly the public_html folder, so no path is necessary. If, for example, the WordPress installation is in public_html/example_dir/applications on your hosting account, then the line for the path in the code should look like this: define('PATH_CURRENT_SITE', '/example_dir/applications');.
So the code that has to be put in the wp-config.php file for setting up a multisite with subdomains is:
define('MULTISITE', true);
define('SUBDOMAIN_INSTALL', true);
define('DOMAIN_CURRENT_SITE', 'yourdomain.com');
define('PATH_CURRENT_SITE', '/');
define('SITE_ID_CURRENT_SITE', 1);
define('BLOG_ID_CURRENT_SITE', 1);
The only thing that has to be changed is to replace yourdomain.com with your own domain name.
As we already mentioned the wp-config.php file is located in the root WordPress folder on your hosting account. So if your WordPress is installed directly in the public_html directory on the account, the path to the wp-config.php file will be public_html/wp-config.php. You can edit the file from the Files section of the HostKnox control panel. An alternatively way is to download it on your local computer with an FTP client (e.g. FileZilla), edit it with a text editor (e.g. Notepad, Wordpad) and upload it back replacing the old file.
Modifications to .htaccess
After you insert the code into the wp-config.php file it's time to edit the .htaccess file. Delete all rules from the .htaccess file of your WordPress installation and replace them with the rules shown below. The rules for a multisite with subdirectories are:
RewriteEngine On
RewriteBase /
RewriteRule ^index\.php$ - [L]

# add a trailing slash to /wp-admin
RewriteRule ^([_0-9a-zA-Z-]+/)?wp-admin$ $1wp-admin/ [R=301,L]

RewriteCond %{REQUEST_FILENAME} -f [OR]
RewriteCond %{REQUEST_FILENAME} -d
RewriteRule ^ - [L]
RewriteRule ^([_0-9a-zA-Z-]+/)?(wp-(content|admin|includes).*) $2 [L]
RewriteRule ^([_0-9a-zA-Z-]+/)?(.*\.php)$ $2 [L]
RewriteRule . index.php [L]
The only thing that might be different in your particular case is the path in the RewriteBase directive. In our example it's just a forward slash because WordPress is installed directly in the public_html folder (which is the document root); if your WordPress is installed in a subfolder then the RewriteBase directive should be set to point to that path. For example, if your WordPress is installed in public_html/applications on your hosting account, then the directive should be RewriteBase /applications.
The rules that you need to put in the .htaccess file of your WordPress installation if you're going to use subdomains are almost the same as those for subdirectories. The only difference is in the two RewriteRule directives that are above the last RewriteRule. The directives for subdomains are:
RewriteEngine On
RewriteBase /
RewriteRule ^index\.php$ - [L]

# add a trailing slash to /wp-admin
RewriteRule ^wp-admin$ wp-admin/ [R=301,L]

RewriteCond %{REQUEST_FILENAME} -f [OR]
RewriteCond %{REQUEST_FILENAME} -d
RewriteRule ^ - [L]
RewriteRule ^(wp-(content|admin|includes).*) $1 [L]
RewriteRule ^(.*\.php)$ $1 [L]
RewriteRule . index.php [L]
In the case with subdomains the RewriteBase is always set just to a forward slash (meaning the application is installed directly in the public_html folder) because subdomains can be used only when WordPress is installed directly in the root web-accessible folder on your hosting account.
Like the wp-config.php file the .htaccess file is in the root WordPress folder. So assuming that your WordPress is installed directly in the public_html folder on your hosting account, the path to the file will be public_html/.htaccess. You can edit it from the Files section of the HostKnox control panel. Another way is to download it on your local computer, edit it with a text editor and upload it back overwriting the old file.
Adding Sites in the Network
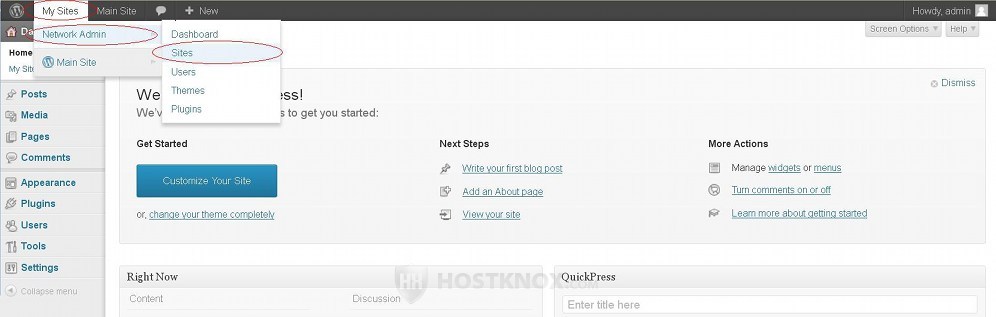
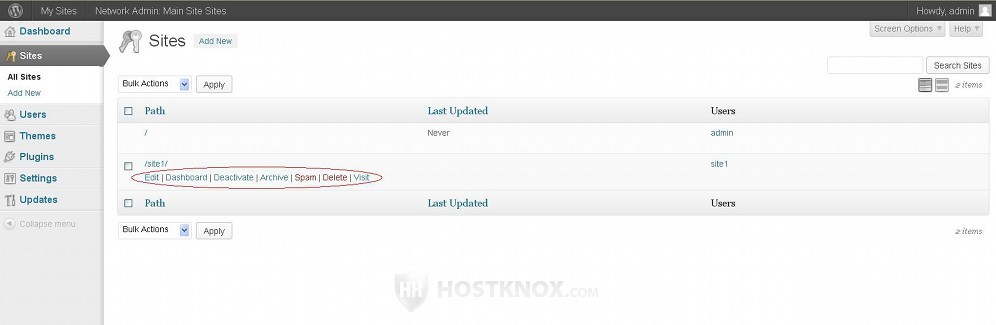
After you enable the multisite function, install the multisite, and add the code to the wp-config.php and .htaccess files you can add sites to your multisite network. To do this refresh or log in again to the admin panel of your WordPress installation. There you'll see a new drop-down menu in the top left corner of the dashboard. That menu is called My Sites. Go to My Sites>Network Admin>Sites:
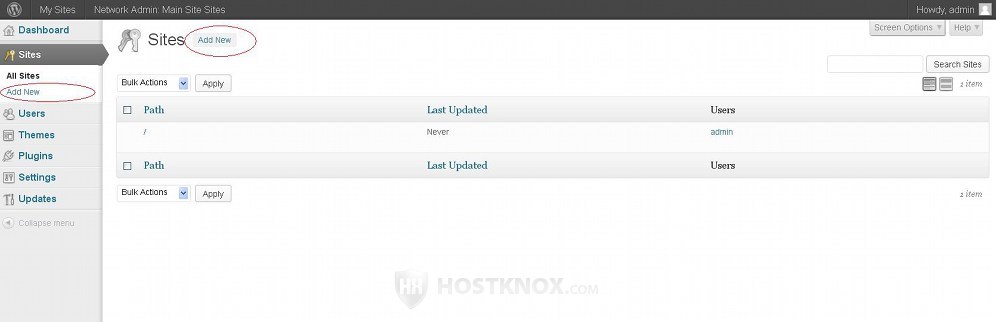
On the page that opens you'll see listed the sites in the network. At this point you'll have only the main site of your installation. To add a new site click on the Add New button that's above the table (there's also a button in the menu on the left):
On the page for adding a new site there are a few options:
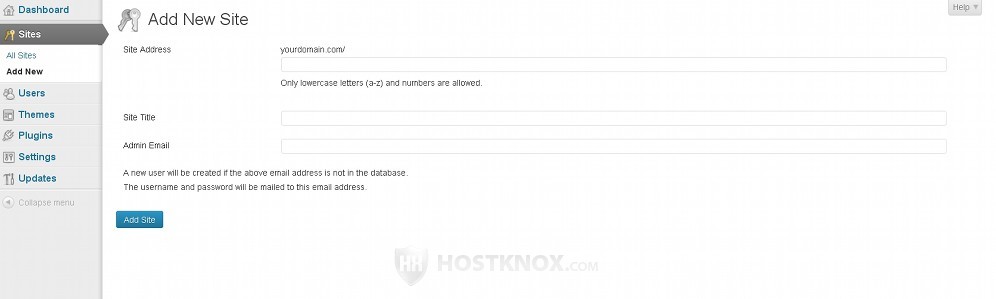
These options are:
- Site Address - in the field that's provided type the name of the site as you want it to be added to the URL address of the main site. Use only lowercase letters, numbers, and don't put spaces. If you set up your multisite to use subdirectories, the typed text will be added as a subfolder to the URL of your main site. For example, if the URL of the main site is yourdomain.com and you type site1 in the field for Site Address, the URL of the added site will be yourdomain.com/site1. If you configured your multisite to use subdomains, then the typed text will be added as a subdomain to the URL address of the main site. For example, if you type site1, then the URL of the added site will be site1.yourdomain.com. So in the text field you only have to type the name of the subdomain or subdirectory; don't type the whole URL address.
- Site Title - in this field type the site title for the new site. The site title is displayed in the header on the frontend of the new site, and it's also used in the admin panel.
- Admin Email - in this field type the email address of the administrator for that site. If you type the email address that you used when installing the WordPress application (the email of the admin for the main installation and respectively the super admin for the whole multisite network), then no new user will be created. Of course, you can put the email address of another user, if you want that user to be the admin for that site. If the user exists, no new user will be created. If there's no such email in the database, then a new user will be created. The login credentials will be sent to the email address. The user will be able to manage only the particular site.
After you're done with the settings don't forget to click on the Add Site button at the bottom of the page. Then when you go to Network Admin>Sites and you hover the mouse pointer over the table row of a particular site you can use the buttons that appear to go to its dashboard/admin panel, to visit its frontend, to delete it, etc.
Of course, once the site is added you can visit its frontend by typing directly its URL in the browse (e.g. yourdomain.com/site1). Its admin panel can also be visited by using directly its URL (e.g. yourdomain.com/site1/wp-admin). As a super admin for the whole network you can access the admin panel of any site in the network from the network admin panel. The WordPress network admin panel has some functions and options that are not available in the admin panel of a single-site WordPress installation.
For more information on WordPress multisite check out the following tutorials:
- how to manage a multisite network in WordPress (a close look at the network admin panel)
- how to configure and manage the network settings in WordPress multisite
- how to manage domain mapping in WordPress multisite