WordPress Languages Tutorial
How to install languages in WordPress
The default WordPress installation package contains one language. This language is U.S. English. If you want to, you can install another language. It's also possible to add more than one language and create a multilingual site. In this tutorial we'll concentrate on installing languages and switching the default language. For information on creating a multilingual site check out the tutorial on how to create a multilingual site in WordPress.
If you just want to change the default English language with a different one and learn how to install languages, keep reading this tutorial to find out how to do it. There are a few ways you can do this:
- In case you want to install a new WordPress instance and you want it to be in a language different than English, then you should check whether there's a full installation pack in the language that you're looking for.
- There are some plugins with which you can install languages automatically without the need to download/upload and modify files.
- Another way to install languages is to do it manually. This involves downloading a language file(s) from the WordPress language file repository, then uploading it to your WordPress installation and performing a modification to the wp-config.php file.
Here we are referring mainly to changing the language used in the admin panel. Of course, no matter what your current language is, you can type your posts and pages in different languages. And the post/page will be displayed only in the language in which you have typed it. If you change the default language the content of existing posts/pages will not be changed. To show the content of posts and pages in more than one language you'll need to create a multilingual site.
Now let's examine the different ways for installing/changing the default language.
Installation Packs in Different Languages
By default, the installation package that you download from the official WordPress site is in U.S. English. For some languages however there are installation packs that are configured to be in the respective language. This means that the descriptions/text during the installation process are in the particular language, the admin panel is in that language and the sample post, page and menus of the default theme that comes prepackaged are in that language.
Some of the languages have their own subdomains on the official WordPress site; for example, fr.wordpress.org for French, de.wordpress.org for German, es.wordpress.org for Spanish, ru.wordpress.org for Russian and others. On the subdomain for each of these languages you can download the WordPress installation pack in the particular language. For other languages there are external sites that offer installation packs in specific languages. You can check that on the following page of the official WordPress site. There you can check whether there are links to sites that offer the installation pack in the language you want.
Note that this is the installation pack for the whole application not just the language files. So this option is useful if you want to create a new WordPress site and you want to use a language other than the default English.
Installing Languages Automatically
WordPress doesn't offer built-in options for installing languages automatically. This can be achieved with the help of a plugin. Two useful plugins with which you can do that are WP Native Dashboard and WordPress Language. Both are installed as any regular plugin (for information on this check out the tutorial on how to install plugins in WordPress). They are convenient and easy to use. If you don't feel comfortable installing languages manually, you can try one of these plugins.
Keep in mind that in case you decide to create a multilingual site, some of the plugins (e.g. qTranslate) that are used for managing a multilingual site also offer options for installing languages automatically. So in this case you won't need a separate plugin for installing languages automatically.
Installing Languages Manually
The process of installing a language manually consists of several steps.
- First you need to download the language file(s) for that language that you want to install.
You can do this from the WordPress Language File Repository. It may look a bit confusing at first but after reading the following explanations hopefully you won't have much trouble finding the language files you need.
The language repository is a list of directories. The directories, as well as the language file that you need to download, are named with the ISO language code followed by an underscore, and then the ISO code of the country; for example, en_US stands for U.S. English, en_GB is for British English, fr_FR for French, de_DE for German, etc. For some languages like Spanish, Portuguese and others there is more than one language pack, each corresponding to a different country in which the particular language is used.
So in the repository find the directory corresponding to the desired language and open it. Inside it you'll see a few other directories each of which may or may not contain language files (you can browse through them if you want to). Select the branches folder; it contains folders that are labeled with the number of the different WordPress versions. Click on the number corresponding to the version of your WordPress (e.g. 3.7). Depending on the particular language, the language files may be directly in the version folder, or there may be no files but more folders. If inside that folder there are folders labeled dist and messages, go to the messages folder. In it you'll see the different language files.
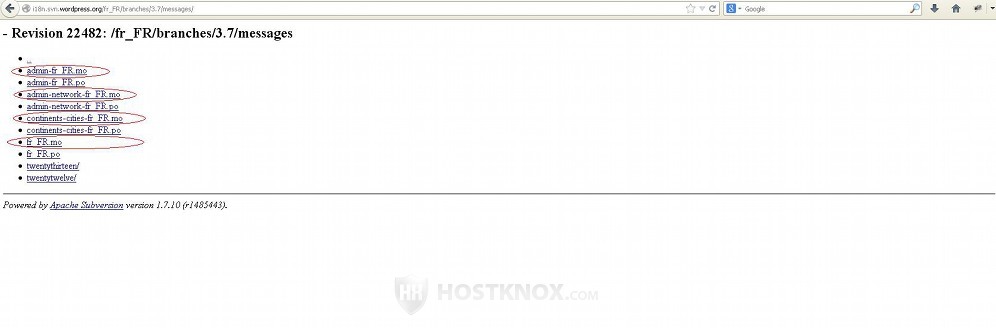
So, for example, if you want to download the French language files for WordPress 3.7, open the language repository page and go to fr_FR/branches/3.7/messages:
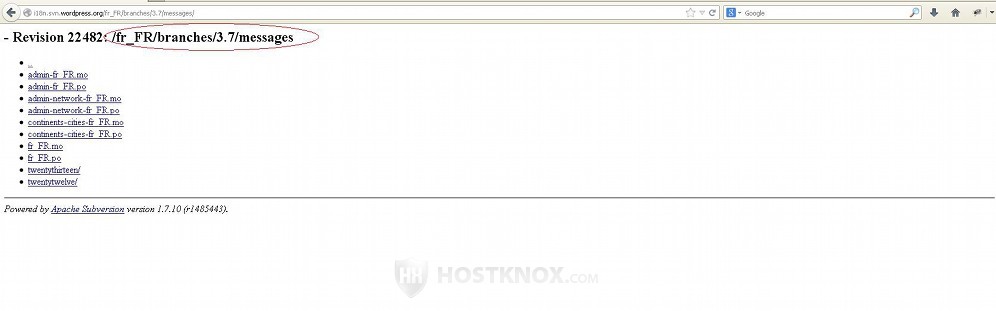
You'll see files with the extensions .po and .mo. You need the .mo files. The main file that you need is labeled only with the two ISO codes that we mentioned. So for French, for example, the file will be fr_FR.mo. You'll most likely see three other .mo files: admin-fr_FR.mo, admin-network-fr_FR.mo, continents-cities-fr_FR.mo (the names are the same for other languages; only the ISO codes are different). For a more complete translation of all the labels and settings you can download these other .mo files as well:
Note that for some languages there are may be no language files at all, or there are may be no files just for a particular WordPress version. Some of the existing translations may not be a hundred percent complete.
To download a file just click on its name with the left mouse button and from the window that pops out select a location on your local computer where you want to save the file.
- After you have the language file(s) on your local computer you have to upload them on your hosting account in /wp-content/languages.
If you haven't installed other languages you probably won't have a languages folder inside wp-content. So you have to create a languages directory first. Assuming that your WordPress is installed directly in the public_html directory on your WordPress hosting account, the path to the wp-content folder will be public_html/wp-content. One way to browse to that directory and create the folder languages is from the Files section of the HostKnox control panel. An alternative is to use an FTP client (e.g. FileZilla). After you make sure that you have a languages folder upload the .mo language files inside it. Again, you can do that from the Files section of the HostKnox control panel or with an FTP client.
- Edit the line define ('WPLANG', ''); that's in the wp-config.php file of your WordPress.
Inside the second pair of quotation marks you have to put the name of the main language file without the .mo extension part. This means that you have to put the two ISO codes separated with an underscore. So, for example, if the language is French the main language file is labeled fr_FR.mo and so you have to put fr_FR inside the brackets. The edited line in the wp-config.php file will look like this: define ('WPLANG', 'fr_FR');
The wp-config.php file is located in the root WordPress folder on your hosting account. So if your application is installed directly in the public_html folder on the account, the path to the file will be public_html/wp-content.php. You can edit the file from the Files section of the HostKnox control panel. Another way to do it is to download it on your local computer, then edit it with a text editor (e.g. Notepad, Wordpad) and upload it back overwriting the old file.
Installing Languages on a Multisite
Installing a language on a WordPress multisite installation is performed in the same way. You can do it manually as described above or you can use a plugin for automatic language installation.
What's different is that after you install a language you can change the default language on a per-site level. From the admin panel of each site in the network you can select the installed language or you can leave English as the default one. To do this, in the admin panel of the site go to Settings menu>General sub-menu and set the Site Language drop-down menu to the language you want. This option can be configured not only by super admins but also by administrators of individual sites. The administrator of a site can change the language for that site. Note that if you change the language of the admin panel of the main site in the installation this will not affect the admin panels of the other sites in the network, but it will change the language of the network admin panel.
Another difference compared to a single-site installation is that when you install manually a language on a multisite you don't have to edit the wp-config.php file. So when you put the language files of more than one language in the wp-content/languages folder you'll actually be able to select from all the installed languages using the Site Language drop-down menu option in the admin panels of the sites in the network. As you know such an option is not available in single-site installations; there you have to edit the wp-config.php file to change the language.
When it comes to plugins such as WP Native Dashboard and WordPress Language for automatically installing languages you can use them to install languages on a multisite. The plugins are installed and managed as other plugins in a multisite network. For more information check out the section on Plugins in the tutorial on how to manage a multisite network in WordPress. If you use such a plugin then the languages are installed and changed from the settings of the particular plugin.
With the WordPress Language plugin the Site Language option in the General Settings section of each admin panel will not be available but from the options of the plugin you can change the language on a per site level. In a multisite network the situation with the WP Native Dashboard plugin is a bit more complicated. From the options of that plugin you can't set a different language per site; the language that you set will be applied to all sites in the network. Since this plugin downloads the language files and puts them on your hosting account (the WordPress Language plugin doesn't do this; it uses the database) the Site Language drop-down menu will be available in the General Settings section of each admin panel but it will not work while the plugin is activated.
Don't forget that here we are discussing only the use of a single language per site. For a multilingual site(s) you have to use other plugins. For more information check out the tutorial on how to create a multilingual site in WordPress.