WordPress Multisite Domain Mapping Tutorial
How to manage domain mapping in WordPress multisite
The WordPress multisite feature allows you to set up a WordPress multisite using either subdomains or subdirectories of the main domain. There are no built-in options for using a separate domain for each site within the multisite network. This can be achieved with the help of a plugin such as the WordPress MU Domain Mapping plugin. With the help of that plugin you can map a separate domain name to a site that you've added to your multisite (regardless of whether it's a subdomain or a subdirectory of the main site). In this way you can have a different domain name for each of the sites in your network. In addition to this if you want to, you can map more than one domain name to the same site.
For more information on how to actually install and configure WordPress multisite read the tutorial on how to set up a WordPress multisite.
In this tutorial we'll go over the process of installing, configuring and using the domain mapping plugin. Installing and using that plugin is more complicated than the basic process of installing the majority of WordPress plugins.
Before you start make sure you have a recent backup copy of the WordPress files and of the database used by the application. If you don't know how to do this check out the tutorial on how to back up your site.
The domain mapping plugin can be used with a multisite that uses subdirectories or subdomains, but the plugin can only be installed in a WordPress that's installed in the root web-accessible folder on your hosting account. So in order to be able to use this plugin your WordPress should be installed directly in the public_html folder on your account (meaning the frontend of the site is accessible at yourdomain.com).
Name Servers and DNS Records
In addition to installing the domain mapping plugin itself there are a few other things that you have to take into account. We'll start with them although if you want to, you can configure them after you install the plugin.
- You have to make sure that the domain name(s) that you want to map to a site in your multisite network is pointed to the hosting account on which your WordPress is installed. There are a couple of ways you can do that. One is to go to the domain name registrar with which that domain name is registered, log into the account there and change the nameservers with the ones for the domain name associated with the hosting account on which your WordPress multisite is installed.
If you have a hosting account (regardless of the hosting provider) associated with the domain name that you want to map, an alternative way is to log into the control panel of that other hosting account and change the IP address of the DNS A record with the IP address of the server on which your WordPress multisite is hosted.
You'll probably find easier the first way of pointing the domain name(s) to the hosting account of your WordPress installation. Besides, in this way you only need the domain name; you don't need a second account with which to associate it and then redirect it from that account to the one on which WordPress is installed.
- The other essential thing is to make sure that the virtual host file of your hosting account (the one with the WordPress installation) is updated with the name of the domain name that you want to map. The way this is done depends on the hosting provider. The process for HostKnox clients is quite simple. Go to the Domain Names and DNS Settings section of the HostKnox control panel. In the black area on the right you'll see a link Add Domain Name. On the page that opens after you click on it type the domain name (e.g. yourdomain2.com; without http:// in front) in the text field that's provided, and click on the Add Domain button. The equivalent in cPanel would be to park the domain name.
Installing WordPress MU Domain Mapping Plugin
Generally, most WordPress plugins can be installed automatically with a few clicks in the admin panel of your WordPress. In the case with the domain mapping plugin, first you have to install it as any other plugin and then some additional tasks have to be performed to make the plugin work. As you know there are two ways to install plugins from the admin panel. You can directly search for the plugin and then use its Install Now button to install it. The other way is to download the plugin from the official WordPress site, then use the Upload button in the Plugins section of the admin panel to upload the plugin from the local computer to your WordPress and install it. Since we'll need the plugin installation package anyway we'll use the second method.
- So the first thing to do is to download the archived installation package to your local computer. You can download it from the page of the WordPress MU Domain Mapping plugin on the official WordPress site.
- Then install the plugin from the WordPress admin panel.
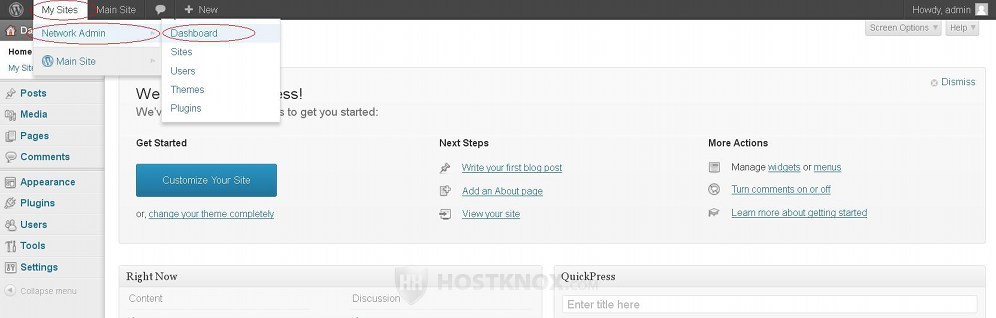
Don't forget that this is a multisite installation an so you have to install the plugin from the network admin panel and not from the admin panel of a site within the network. To do this after you log in to the admin panel of your main site (or another site in the network) as a super admin, go to the My Sites menu in the upper left corner>Network Admin>Dashboard:
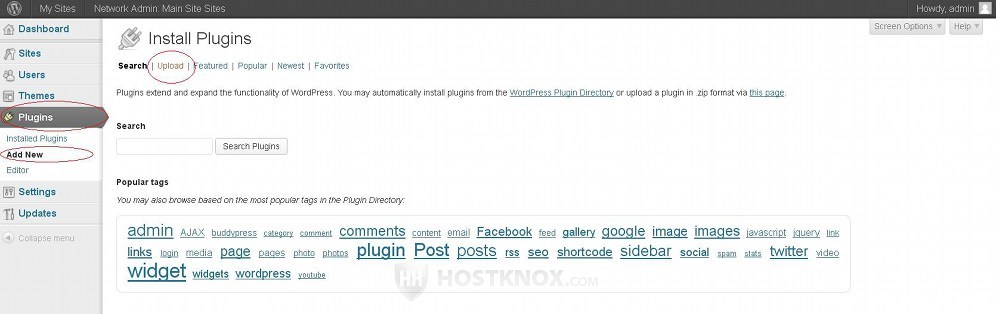
After you go to the dashboard of the network admin go to Plugins menu>Add New and on the page that opens click on the Upload button that's in the top left corner:
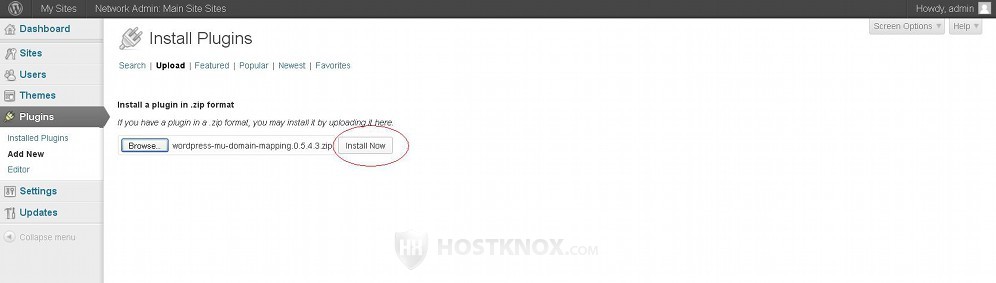
On the next page you'll see a text field with a Browse button in it. Click on it and from the window that pops out find the archived plugin installation package that's on your local computer. Then click on the Install Now button:
After you do that you should see a message informing you that the plugin was installed successfully. What WordPress actually does is to upload and unzip the plugin archive into the plugins folder of your WordPress installation (this can also be done manually).
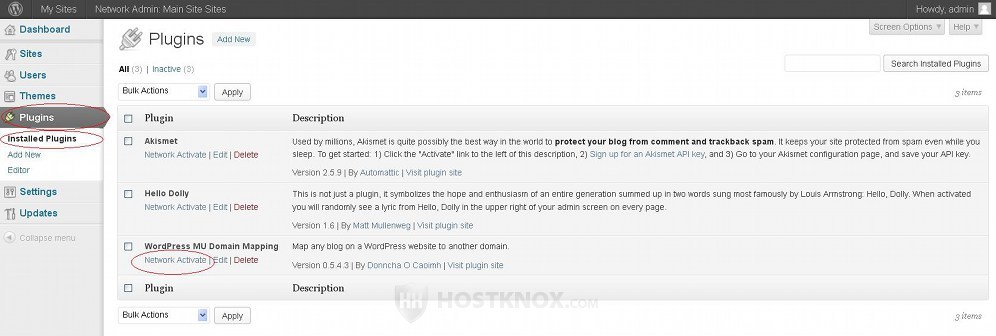
- After that you need to activate the plugin. In the network admin panel go to Plugins menu>Installed Plugins and click on the Network Activate button for the plugin WordPress MU Domain Mapping:
Now let's continue with the rest of the things that have to be performed to complete the installation.
- On your local computer find the zipped plugin installation package of the domain mapping plugin and unzip it. The unzipped folder will be labeled wordpress-mu-domain-mapping and inside it you'll find several files. One of these files is sunrise.php. You need to upload that file into the wp-content folder of your WordPress installation.
Since the domain mapping plugin can function only with installations that are installed directly in the root web-accessible folder on the hosting account (public_html), then the path on your WordPress hosting account to the folder into which you have to upload sunrise.php should be public_html/wp-content. You can upload the file from the Files section of the HostKnox control panel or you can use an FTP client (e.g. FileZilla).
- Edit the wp-config.php file of your WordPress and add to it the following code:
define('SUNRISE', on);
Make sure that you add the code above the line:
/* That's all, stop editing! Happy blogging. */
that's in the wp-config.php file.
The wp-config.php file itself is in the root WordPress folder, so the path to it on your hosting account should be public_html/wp-config.php. You can edit the file from the Files section of the HostKnox control panel. An alternative is to download it on your local computer with an FTP client (e.g. FileZilla), edit it with a text editor (e.g. Notepad, Wordpad) and upload it back overwriting the old file.
- The next step is to refresh the network admin panel. Now when you go to the Settings menu on the left there should be a couple of new sub-menus: Domain Mapping and Domains. The Domain Mapping menu contains the configuration settings of the plugin, while the Domains menu displays the options for mapping domain names to sites. At this point what you need to do is to click on the Domain Mapping menu. This will automatically create a table in the database. That table is necessary for the functioning of the plugin. At the top of the page that opens you'll see a message informing you that such a table was created:
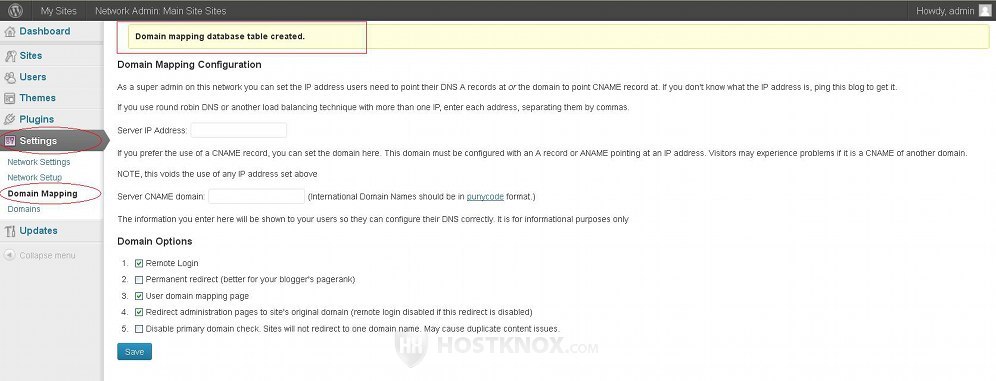
You don't have to edit any of the settings on the domain mapping configuration page in order for the plugin to work. So at this point the plugin is installed and ready to use.
You should keep one thing in mind however. You can map domain names either from the network admin panel or from the admin panel of the particular site. In case you (as well as other admin users) want to be able to map domain names to a site from the admin panel of the particular site, you have to add in the field for Server IP Address on the Domain Mapping Configuration page of the network admin panel (shown on the screenshot above) the IP address of the server on which the WordPress installation is hosted. If you don't add it, the respective domain mapping options will not be visible in the admin panels of the sites that are in the multisite network. Note that even if you don't put the server IP address you are still going to be able to map domain names from the network admin panel. We'll review the domain mapping configuration options further down in this tutorial.
In the next section of this tutorial we'll show you how to actually map domain names to sites that you've added to your network. And in the section after it we'll review the settings on the Domain Mapping Configuration page.
Mapping Domain Names to Sites
As we already mentioned, it doesn't matter whether you've configured your multisite to add sites in the network as subdirectories of the main domain (e.g. yourdomain.com/site1) or as subdomains (site1.yourdomain.com). In both cases you can map domain names to sites within the network.
If you don't know how to add sites in a multisite network you can find more information in the section on adding sites to a multisite in the tutorial on how to set up a WordPress multisite. You can also find such information in the tutorial on how to manage a multisite network in WordPress.
When it comes to domain mapping there are a couple of ways to do this. One is to do it from the admin panel of the particular site and the other is to do it from the network admin panel. You'll probably find the first way easier. We'll explain both ways.
- To map a domain name to a site from the admin panel of that particular site, first access the admin panel of the site. You can do that by either using directly the URL of the site's admin panel (e.g. yourdomain.com/site1/wp-admin), or by going to the Sites section of the network admin panel (My Sites menu in the upper left corner>Network Admin>Sites), hovering the mouse pointer of the row in the table corresponding to the particular site and clicking on the Dashboard button that displays under the name of the site. Once you open the dashboard of the site go to Tools menu>Domain Mapping sub-menu. On the page that opens you'll see the option for adding domain names:
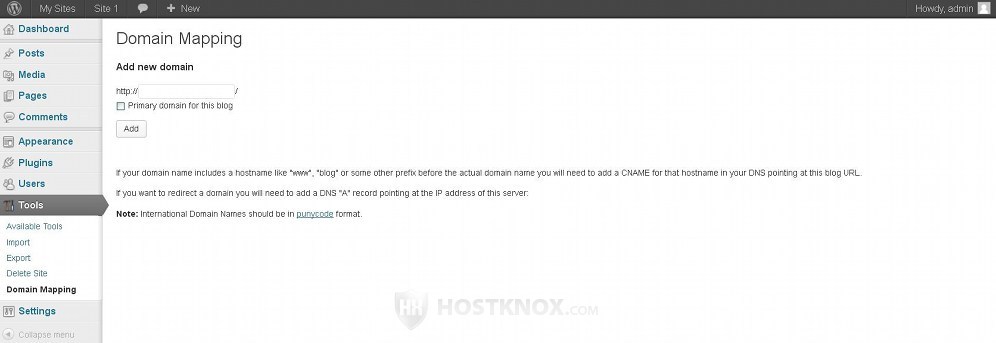
Just type the domain name (e.g. yourdomain2.com) in the field that's provided. WordPress automatically adds http:// in front of the domain name and a trailing slash at the end. Under the text field there's a checkbox labeled Primary domain for this blog. With this checkbox you can control which URL is shown in the web browser. The original URL of the site and the mapped domain name can be used to access the site but the primary domain name will be shown in the URL address field of web browsers. For example, let's say that you have in your multisite network a subdirectory site with the original URL yourdomain.com/site1. You have another domain name yourdomain2.com and you add it to this site as a mapped domain name. If you don't mark the checkbox Primary domain for this blog, both URLs can be used to access the site but the browser will display in its address box the original URL yourdomain.com/site1. If you mark the checkbox when adding the domain, again both URLs can be used to access the site but this time the URL yourdomain2.com will be shown in the address field of the browser.
You can add more than one domain name to a site and they all can be used to access the site. There can be however only one primary domain name. The mapped domains will be listed on the Domain Mapping page of the admin panel. To change the primary domain just mark the radio button that's in front of the domain name that you want to set as the primary one and click on the Set Primary Domain button. By clicking on the Del button for a particular domain you can remove it so that it cannot be used for accessing the site:
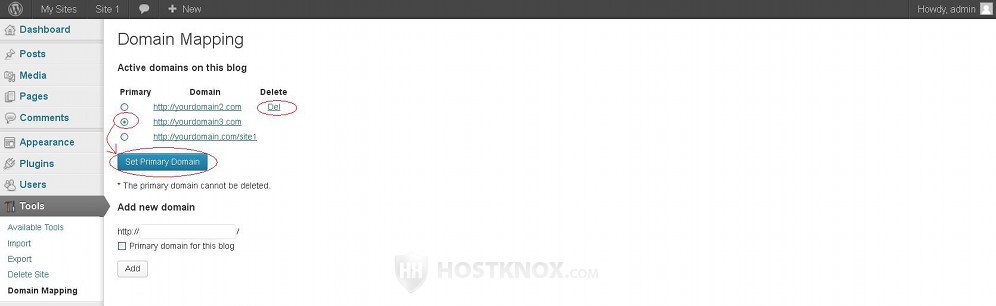
The original/base URL cannot be deleted and the domain that's primary at the moment cannot be deleted either. In your example screenshot above the original domain is yourdomain.com/site1 and there are two other domains that we've added: yourdomain2.com and yourdomain3.com (yourdomain3.com being the primary).
- You can also map domain names to sites in your network from the network admin panel. To do this go to My Sites menu in the upper left corner>Network Admin>Dashboard. Then go to the Settings menu>Domains sub-menu. On the page that opens you'll see some options for adding domain names, as well as a table that lists all the mapped domain names for all sites in the network:
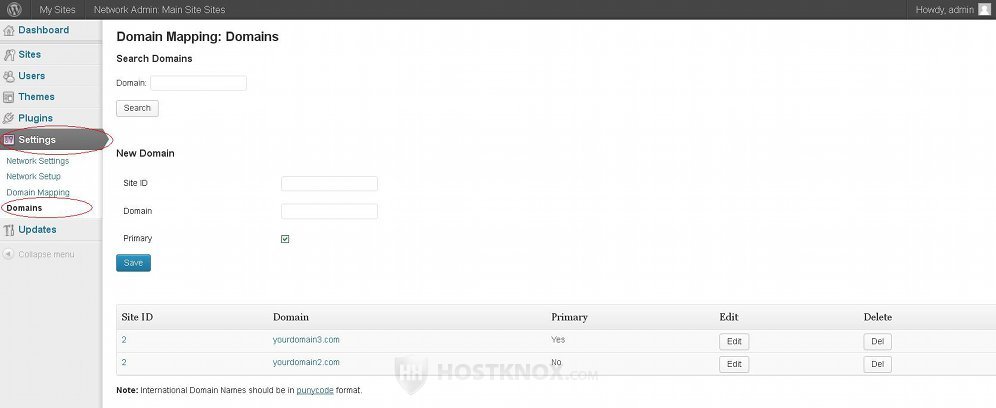
Using the respective buttons in the table you can edit and delete domains that you've already added.
To add/map a new domain to a site type the number of the site's ID in the field for Site ID, then put the domain that you want to add (e.g. anotherdomain.com) in the field for Domain. If you want the new domain to be the primary one mark the Primary checkbox. If you don't want it to be the primary, unmark the checkbox. Then click on the Save button. As we already explained when discussing how to add domains from the admin panel of a particular site in the network, the primary domain name is the one that shows up in the address bar of web browsers.
The problem here is that you probably won't know what the ID of the particular site in your network is. One way to find out is to go to My Sites menu>Network Admin>Sites, then hover the mouse pointer over the name of the site in the table that lists the sites in the network. At the bottom of the page the browser will display the URL of the link; in that URL you can see the ID number of the site.
Keep in mind that you can't map domain names to the main site of your multisite network. For example, if your main site is yourdomain.com (the URL that corresponds to your WordPress installation) and you have added yourdomain.com/site1 and yourdomain.com/site2 as sites in the multisite network, then you can map domain names only to yourdomain.com/site1 and yourdomain.com/site2. Even if you try to add domains to the main site nothing will happen.
Domain Mapping Configuration Options
The domain mapping plugin has some additional options that you can configure. In this section we'll review them. To access these options go to My Sites menu>Network Admin>Dashboard. Then go to Settings menu>Domain Mapping sub-menu:
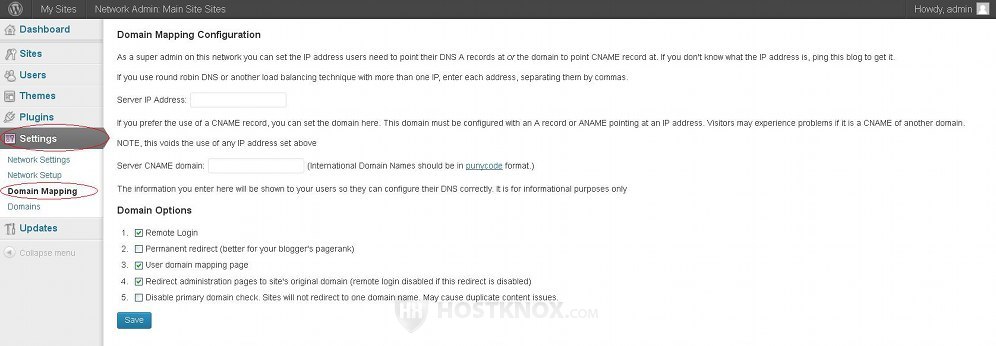
There are no required options here that you have to configure so that you can use the domain mapping plugin.
The first two options are Server IP Address and Server CNAME domain. You don't have to configure them to be able to use the domain mapping plugin. However if none of these two settings is configured, the domain mapping options in the admin panels of the sites in your multisite network will not be visible; so users won't be able to add domains to a site from the admin panel of that particular site. This can still be done from the network admin panel regardless of whether any of these two options is configured. If you put a value (no matter whether it's actually correct) for one of these two options, admins will be able to add domains to a site from the admin panel of the particular site (not only from the network admin).
The server IP and server CNAME are actually added just for reference. In this way other admin users will know where to point a domain name that they want to map to one of the sites in the multisite network. The more common way is to use the server IP address so here's how to configure that option:
- Server IP Address - in this field put the IP address of the server on which your WordPress multisite network is hosted. Actually, depending on the server setup (that of the vitual host file of your hosting account, to be more precise), you can use either the server IP address or the IP address of the main WordPress site (the one corresponding to the WordPress multisite installation). HostKnox hosting accounts are configured in such a way that both the IP of the server and the IP of the site will work no matter whether the IP of the site is a dedicated one. With some hosting providers if the hosting account is on a shared server and the account doesn't have a dedicated IP, then the IP of the server has to be used; while if there's a dedicated IP it has to be used instead of the server IP.
If you don't know what the IP address of your site is, you can find out very quickly. If you're a Windows user, on you local computer click on the Start menu and select Run. A window will pop out; in the text field of that window type cmd and click on OK. This will start the command prompt. In the command prompt type ping yourdomain.com (replace yourdomain.com with the actual domain name) and press Enter on your keyboard. The command prompt will show you the IP address of your site. Of course, there are other ways to check the IP of your site; this is just one suggestion.
As we mentioned, this option really isn't essential for the functioning of the domain mapping plugin. The IP address is used only for reference for other admin users to know where to point DNS A records of other hosting accounts; these are hosting accounts for domain names that are to be mapped to sites in your multisite network. As we explained in the section on DNS records and nameservers this is one of the ways to point domain names to the WordPress multisite installation (the other is just to change the nameservers of the domain that is to be mapped).
The other options on the Domain Mapping Configuration page are:
- Remote Login - this option is enabled by default. This means that when you log into one of the sites in the network you'll be logged into the others as well.
- Permanent redirect (better for blogger's pagerank) - by default, this option is disabled. This means that when a user/visitor is redirected from a mapped domain to the primary one the HTTP redirect status is set to 302 (temporary). For example, you have a site yourdomain.com/site1 in your multisite network. The domains yourdomain2.com and yourdomain3.com are mapped to that site which means that any of the three URLs will display the same site. The domain yourdomain2.com is set to be the primary one. So when people use the URLs yourdomain.com/site1 and yourdomain3.com they will be redirected to yourdomain2.com and the redirect status will be set to 302 temporary. If you mark this checkbox, the HTTP redirect status will be 301 (permanent). This is better in terms of SEO (Search Engine Optimization).
- User domain mapping page - this option is enabled by default. As we already explained in the section on mapping domain names to sites in this tutorial, domains can be mapped to a site either from the network admin panel or from the admin panel of the particular site. If you disable this option, the settings for mapping domain names will be removed from the admin panels of individual sites so that domain mapping can be done only from the network admin panel.
- Redirect administration pages to site's original domain (remote login disabled if this redirect is disabled) - this option is enabled by default. Disabling it will automatically disable the Remote Login option too. As the name of the option suggests it concerns only admin pages. When it's enabled even if the user opens the admin (or any admin page) with the URL of a mapped domain, they will be redirected to the base/original URL of the corresponding site to which the domain is mapped. For example, let's say that you have a site yourdomain.com/site1 in your network and the domain yourdomain2.com is mapped to that site. With this option enabled opening yourdomain2.com/wp-admin will redirect you to yourdomain.com/site1/wp-admin even if yourdomain2.com is set to be the primary domain. And all pages within the admin will also be redirected (e.g. yourdomain2.com/wp-admin/themes.php to yourdomain.com/site1/wp-admin/themes.php, yourdomain2.com/wp-admin/plugins.php to yourdomain.com/site1/wp-admin/plugins.php, etc.).
If you disable this option no such redirecting will occur. So using the above example, if yourdomain2.com is the primary domain and you open the yourdomain2.com/wp-admin you'll not be redirected to yourdomain.com/site1/wp-admin. However, the admin pages of other mapped domain names will be redirected to the primary domain. For example, if you have another domain called yourdomain3.com which is also mapped to yourdomain.com/site1, and you open yourdomain3.com/wp-admin, it will be redirected to yourdomain2.com/wp-admin. - Disable primary domain check. Sites will not redirect to one domain name. May cause duplicate content issues. - this option is disabled by default. This means that you can choose one of the mapped domain names to be the primary one. For example, let's say that you have a site yourdomain.com/site1 in your multisite network and two domain names are mapped to it: yourdomain2.com and yourdomain3.com. You have set yourdomain2.com to be the primary one. All three URLs display the same site but if yourdomain.com/site1 or yourdomain3.com is used, then the URL shown in the web browser will be that of yourdomain2.com (the primary domain). If you disable this option no such URL rewriting will occur. It's not recommended to disable this option because this may cause some problems.
If you make any changes to the configuration options don't forget to click on the Save button.
Here are some other tutorials related to WordPress multisite that you may find useful:
- how to set up a WordPress multisite
- how to manage a multisite network in WordPress (detailed review of the network admin panel)
- how to manage the network settings in WordPress multisite