WordPress Multisite Network Administration Tutorial
How to manage a multisite network in WordPress
Using a single WordPress installation you can have a multisite network with more than one site in it. Each site has its individual admin panel that has the same options as the admin panel of a regular single-site WordPress installation. In addition to this there's a network admin panel from which the whole multisite network can be configured and managed. The network admin panel is a bit different than a normal admin panel and has some additional settings that are not present in an admin panel of an individual site. In this tutorial we'll go over the basic sections of a network admin panel and we'll point and review aspects in which it differs from the admin panel of an individual site.
We've divided this tutorial into the following sections:
- Accessing the Network Admin Panel
- Sites
- Users
- Themes
- Plugins
- Posts, Pages, Categories and Tags
- Permalinks
- Network Settings
- Network Upgrades
For information on creating a multisite network check out the tutorial on how to set up a WordPress multisite.
Accessing the Network Admin Panel
After you complete the installation of the WordPress multisite a new user role is created. That's the super admin. This is the user that has accesses to the network admin panel. Normally, the user that's added as the super admin is the first administrator of the main site (the site corresponding to the WordPress installation); this is the admin that's created during the installation of WordPress.
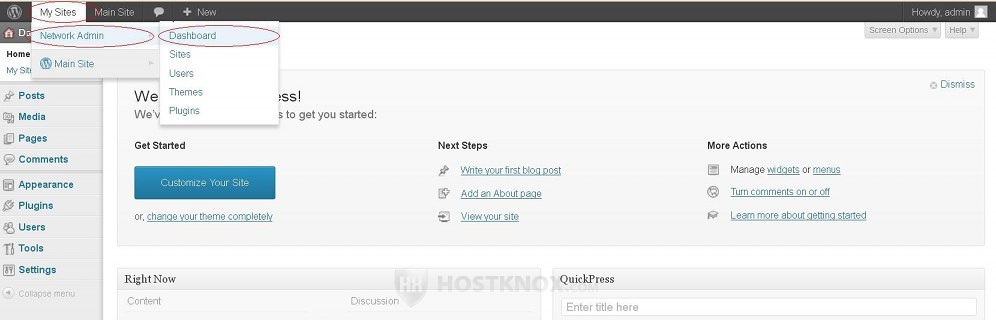
As a super admin you can log into the admin panel of any of the sites in the multisite network and from that admin panel you can also access the network admin panel. For example, if you log into the admin panel of the main site, you can access the network admin panel by going to the My Sites menu in the top left corner>Network Admin>Dashboard:
The process is the same for accessing the network admin panel from the admin panel of any individual site in the network.
You can also open and access the network admin panel by using directly its URL address. If the URL address of you main site's frontend is yourdomain.com, then the URL of its admin panel will be yourdomain.com/wp-admin and the URL of the network admin panel will be yourdomain.com/wp-admin/network. This will open the login page and after you use the credentials of the super admin you'll be logged directly into the network admin panel.
Sites
The Sites section of the network admin panel is crucial for managing the multisite network. There's no such section in the admin panel of a regular WordPress installation. It's the place from which you can add new sites to the network. You can also use the respective buttons to go to the dashboard of a site in the multisite network, to visit its frontend, to edit some of its settings and to delete it.
To access the Sites section, after you log into the network admin panel just go to the Sites menu on the left. On the page that opens you'll see a table with the existing sites in the network:
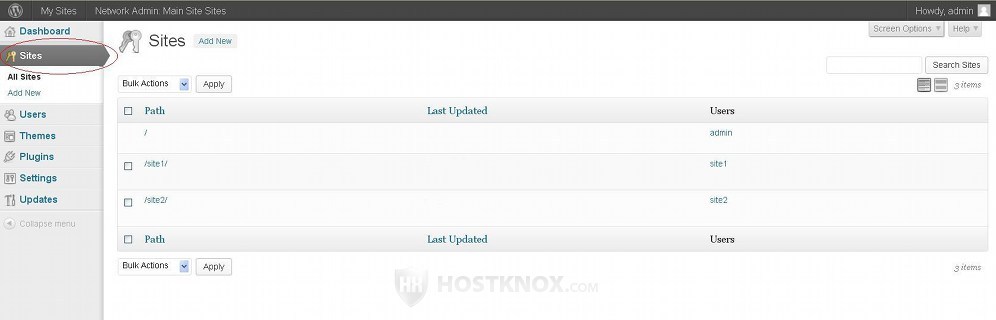
If you haven't added any sites, only the main site associated with the WordPress installation will be listed. On our example screenshot above there are two sites in addition to the main one, and we've used a multisite with subdirectories. The table that lists the sites is divided into a few columns. You can control which columns are shown or hidden by using the screen options. Click on the Screen Options button in the top right corner of the page and mark/unmark the respective checkbox(es) in the panel that appears. You can't hide only the column for the path/subdomain of the sites.
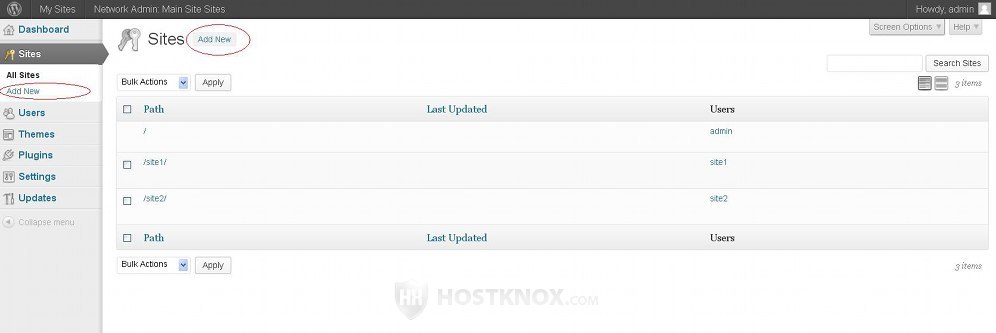
To add a new site click on one of the two Add New buttons. There's one above the table and one in the menu on the left:
The form for adding new sites is quite simple:
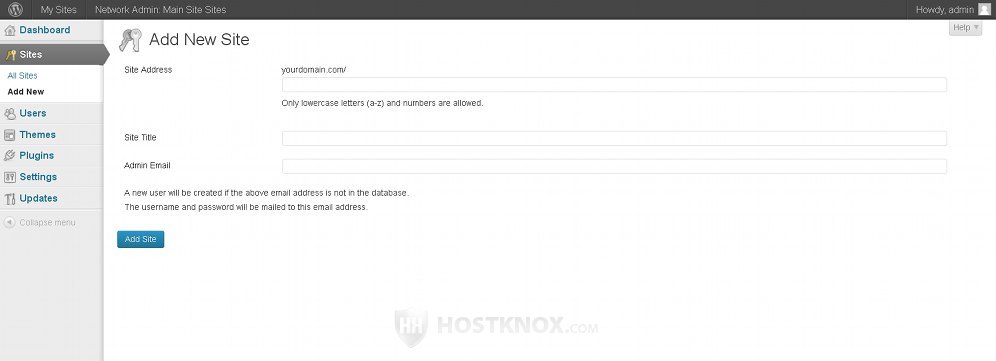
The options are:
- Site Address - type the path or the subdomain part for the URL of the site that you want to add. If you have set up your multisite to use subdirectories type just the name of the subdirectory as you want it to appear in the URL of the site. For example, if the URL of the main site is yourdomain.com and you want the new site to be yourdomain.com/site1, just type site1 in the field for Site Address. If your multisite uses subdomains and you want the URL of the new site to be site1.yourdomain.com, again type site1 in the field. In other words, don't type the whole URL but just the part that is to be added to the URL of the main site. You can use only lowercase letters and numbers; don't use spaces. It's possible to change the site address after the site is added. You can do this from the Info page of the site's settings. You'll find information about this a bit further down in this tutorial.
- Site Title - in this field type a name for the site. That's the name which will be displayed in the header on the frontend of the site. The site title can be change at any time even after you add the site.
- Admin Email - this is the email address for the administrator of the new site. The login credentials will be sent to the email address. If there's no such email in the database a new user will be created. For a username of the new user WordPress will automatically use the site name part of the URL of the new site; for example, if the address of the new site is yourdomain.com/site1, then the username of the new user will be automatically set to site1. If you want to, you can edit it after the user is created. In case you don't want a new user to be created, you can put the email address of an existing user. The admin will be able to access and manage only the admin panel of that particular site.
After you're done with the options click on the Add Site button.
From the Sites section of the network admin panel you can do some other things in addition to creating sites. When you hover the mouse pointer over a row in the table that lists the sites some buttons will appear:
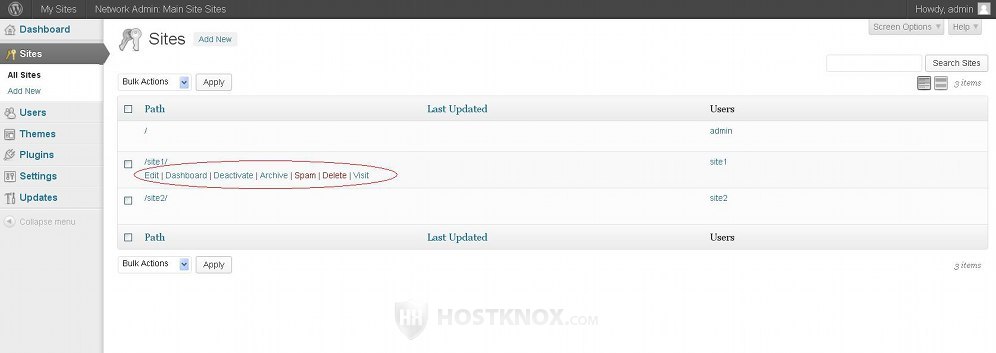
With the respective button you can deactivate the site or delete it altogether; you can also visit its frontend (with the Visit button) or go to its admin panel/dashboard. The Edit button will open a page with various settings. In fact there are a few pages with options. You can switch the pages with the help of the tabs at the top. By default, the Info tab is clicked:
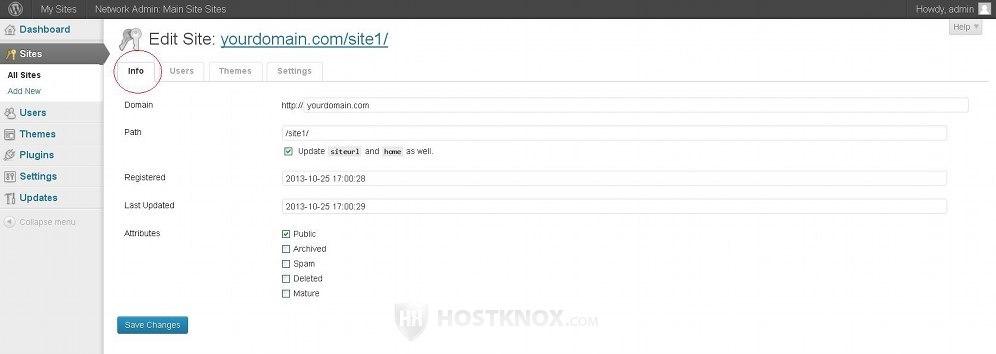
The Info page shows general information about the site such as the domain and path of the site, the registration date and the date when it was last updated. If you want to you can change the path or the subdomain part, depending on whether the multisite is configured to work with subdirectories or subdomains, of the URL address. For example, if the current URL of the site is yourdomain.com/site1 and you change the path in the Path field from /site1/ to /site3/, then the URL of the site will become yourdomain.com/site3. If you make such a change don't forget to click on the Save Changes button at the bottom.
The second tab is Users and it shows a table with the existing users for that site. There are also options for adding an exiting user to that site or for adding a new user:

The table shows only the users registered on that particular site (note that the same user may have accesses to more than one site in the network). If you hover the mouse pointer over a row in the table a couple of buttons will appear. One is for removing/deleting the user and the other is for editing the profile of the user. The Edit button will send you to the profile page of the user in the network admin panel (the user's profile can also be edited from the admin panel of the particular site). You can also use the drop-down menus above the table to remove users or change the role of more than one user simultaneously. Before that of course you have to mark the checkboxes that are in front of the user names in the table.
On the Users page there are also a couple of forms: Add Existing User and Add New User. If there's a user that's registered on another site in the multisite network and you want to add that user to this site, you can use the options in the Add Existing User area. Just type the username of the user, select a user role from the Role drop-down menu and click on the Add User button. The same user can have a different role for each site on which they are registered.
To add a new user, type a user name in the Username field that's under Add New User, type the email address of the person in the respective field, select a role and click on the Add New User button. The login credentials will be sent to the specified email address.
As we mentioned, users can also be added and managed from the admin panel of the particular site. You can also add and manage users for the whole network from the Users section of the network admin panel.
The next tab in the Edit Site section is Themes. It shows a table with the installed themes:
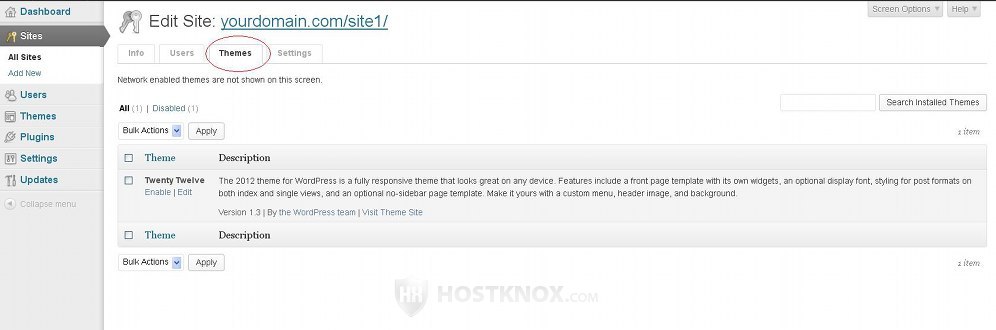
As we'll later explain in the Themes section of this tutorial, in a WordPress multisite themes can only be installed from the network admin panel. From that section of the network admin panel you can also network enable themes so that they can be used by each site in the network.
From this particular Themes tab page of the network admin panel you can enable installed themes only for the particular site. This is useful if you want a theme not to be enabled for all the sites in the network but just for a particular site(s). You can then activate any of the enabled themes from the admin panel of the particular site. As you know the activated theme is the one that's displayed on the frontend. So there's a distinction between active and enabled themes.
The next tab on the Edit Site page is Settings. It displays a whole bunch of settings related to the site that you're editing:
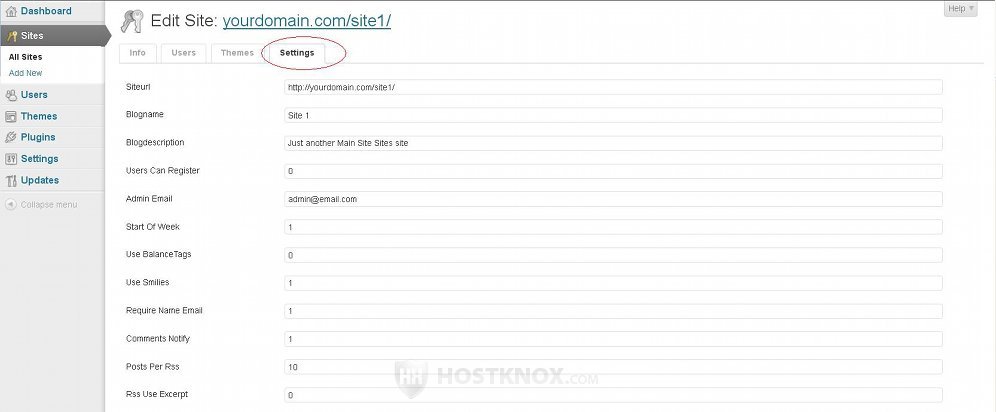
The list of options on this page is quite long. The values for these options are shown as they exist in the database. That's why many of the options are set either to the number zero or one (which means correspondingly that the option is disabled/enabled). We don't recommend that you change any of the options on this page unless you are certain what it's for. For many of the things you'll find corresponding options in the admin panel of the particular site.
Users
The Users section of the network admin panel functions in the same way as the one in regular admin panels but there are some differences. To access it just click on the Users menu on the left. On the page that opens you'll see a table that lists the registered users for the whole network, regardless of whether a user has access to one or more sites in the multisite network (this is shown in the Sites column of the table). As usual you can hover the mouse pointer over a row in the table and use one of the respective buttons that appear to edit the profile of the user or to delete the user. To add a new one click on one of the two Add New buttons (there's one above the table and another one in the menu on the left):
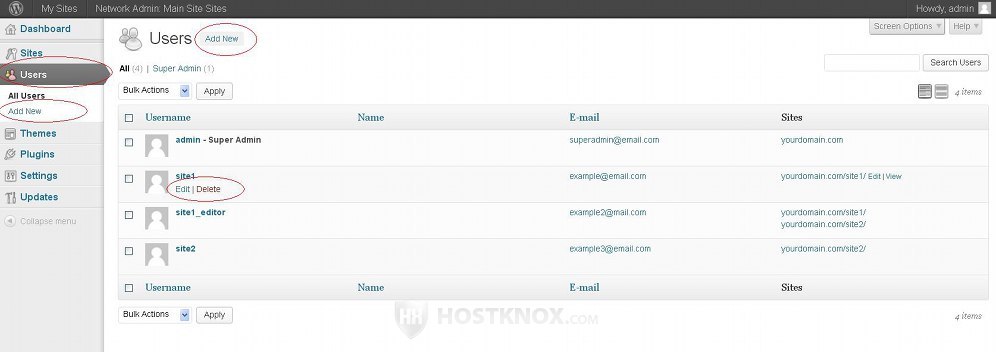
When you add a user from the network admin panel however that user is registered on all sites in the multisite network. The add form itself is a bit different compared to the one in an admin panel of an individual site. The difference is that on the add user form in the network admin panel there's no option for selecting a user role for the new user:
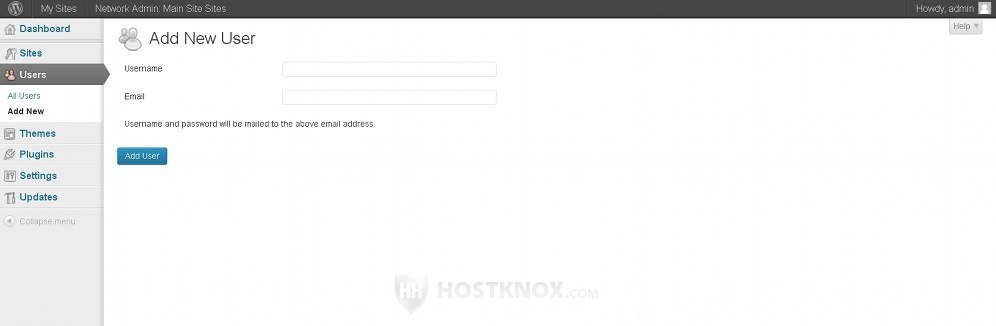
You only have to type a username and the email address of the user. The login credentials will be sent to the email address. The user will be listed in the table with the existing users but the column indicating the sites on which the user is registered will be empty. This however is misleading because the user will be added to all sites in the network with the user role of Subscriber for all sites. The user will not be listed in the Users sections of the admin panels of individual sites. Since this may cause confusion we recommend that you add users either from the Users section of the admin panel of each individual site, or if you want to do it from the network admin panel, go to the Sites section>Edit button for the particular site>Users tab (as described in the Sites section of this tutorial).
The user edit form in the network admin panel also doesn't have an option for changing the role of the user so you have to do that from the admin panel of the particular site. There's one option on the user edit form of the network admin panel that's not present on the same form of the admin panels of individual sites. With that option you can make the user a super admin:

Just mark the Super Admin checkbox, click on the Update User button and the user will be granted super admin permissions and will be able to access the network admin panel.
You can add the same user to more than one site and from the admin panel of each site you can assign a different user role to that user. So a single user may have different privileges and permissions for the different sites on which he/she is registered.
Another thing peculiar to a multisite network is that unlike site administrators of regular single-site WordPress installations, site admins of individual sites in a multisite network cannot install plugins and themes, and cannot add and edit users. This can only be done by super admins/network admins. There's an option in the network admin panel however with which you can allow site admins to add and edit users form the admin panel of the particular site. To do this in the network admin panel go to Settings menu>Network Settings sub-menu and mark the checkbox Add New Users:
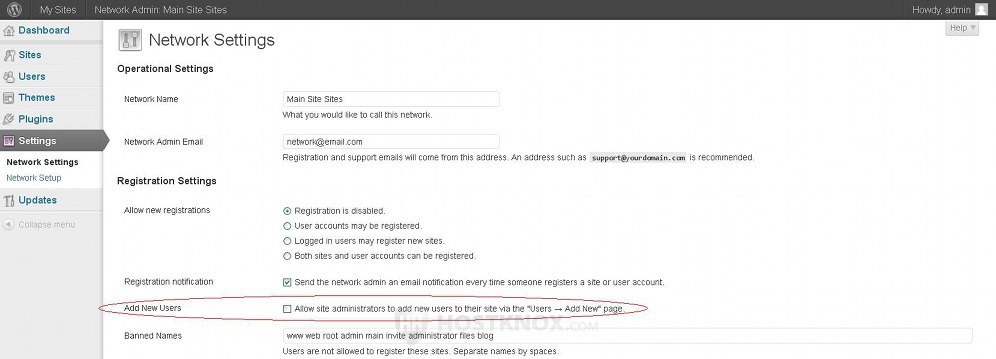
Don't forget to click on the Save Changes button at the bottom.
Themes
From the Themes section of the network admin panel you can install new themes, you can delete existing themes, you can enable/disable installed themes, and you can edit the files of installed themes. When you click on the Themes menu in the network admin panel you'll see displayed on the page that opens a list of the installed themes:

To install a new theme use one of the two Add New buttons (above the table and in the menu on the left). The process is exactly the same as from the admin panel of a regular WordPress installation. For more information on installing themes check out the tutorial on how to install themes in WordPress.
When it comes to a multisite network there are a few things you have to keep in mind. Themes can be installed only from the network admin panel. They cannot be installed from the admin panels of individual sites in the network even by super admins. Installed themes can then be enabled and disabled. This is again done from the network admin panel. In the Themes section there's a corresponding button under the name of the theme:
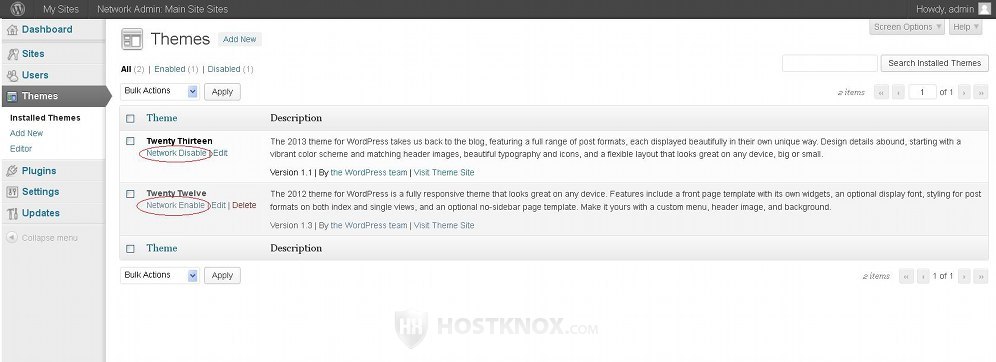
This will enable/disable the theme for all the sites in the network. If a theme is network enabled, it will be visible in the Themes section of the admin panel of each individual site in the network and can then be activated to be the current active theme for that site.
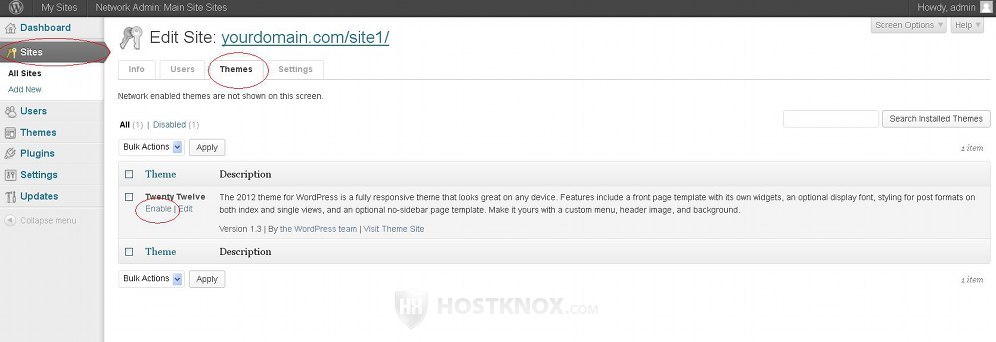
It's also possible to enable a theme only for a particular site in the network so that it's visible and can be activated only for that site from its admin panel. To do this, in the network admin panel go to the Sites menu, then on the page that opens click on the edit button for the particular site, on the following page click on the Themes tab at the top and then click on the Enable button for the theme you want to enable:
Another thing peculiar to a multisite installation is that if you edit the files of a theme, the changes will be reflected on all sites for which the theme is enabled and activated. To avoid this you can create a child theme for each site, enable it for that site, then activate it from the admin panel of the site. You can then edit the files of the child theme, the changes will apply only to the site for which the child theme is activated. For information on how to create child themes check out the tutorial on how to create a child theme in WordPress.
Plugins
The situation with plugins in a multisite installation is similar to that of themes. Plugins can only be installed from the network admin panel. They cannot be installed from the admin panels of individual sites in the network regardless of whether you're logged in as a super admin. Go to the Plugins section of the network admin panel to see listed all the installed plugins (both activated and deactivated), to add new plugins and to network activate/deactivate plugins. Plugins are installed in the same way as in a regular WordPress installation (see the tutorial on how to install plugins in WordPress). To activate or deactivate a plugin for all sites in the network click on the corresponding button under the name of the plugin:
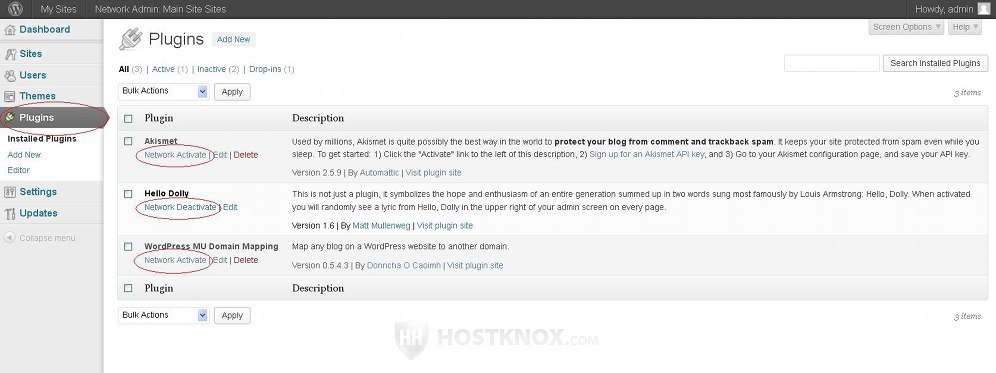
Plugins that are network activated or deactivated are respectively activated or deactivated for all sites within the network.
All installed and network deactivated plugins are listed in the Plugins section of the admin panel of each individual site in the network, and can be activated from there only for that particular site. If however a plugin is network activated it's not listed in the admin panels of individual sites and thus cannot be deactivated from the admin panels of sites. You can use this if you want a plugin to be so to say obligatory for all sites.
Note however that by default administrators of individual sites in the network don't have access to the Plugins section of the admin panel that they manage. So the per site plugin activation can be performed only by super admins. If you want to give site admins access to the Plugins section of admin panels so that they can activate/deactivate plugins for the site that they manage, you can do this by enabling an option in the network admin panel. To do this, in the network admin panel go to Settings menu>Network Settings sub-menu. On the page that opens scroll down to the section labeled Menu Settings and mark the checkbox Plugins. Don't forget to click on the Save Changes button.
If a plugin is activated on a per site level, then you network activate the same plugin and after that you network deactivate it, the plugin will still be activated for that particular site.
Posts, Pages, Categories and Tags
Posts, pages, categories and tags can be created and managed only from the admin panels of each individual site. In other words they are created and managed on a per site level. You can't create and manage them from the network admin panel. That's way in the network admin panel there are no options for adding and editing posts, pages, categories and tags at all.
Permalinks
The network admin panel itself doesn't have any options related to permalinks. These are managed from the admin panels of the sites in the multisite network. There are a few things that are different in comparison with a regular WordPress installation with a single site.
If you have set up your multisite to use subdirectories and you have enabled pretty permalinks for the main site, then the path /blog is automatically added to the URLs of posts on the main site. For example, if the main site is yourdomain.com (meaning the sites in the network will have URLs like yourdomain.com/site1) and you use the post name permalink structure, then URLs of posts will have the structure yourdomain.com/blog/post-name. In a single site WordPress installation the URLs will be yourdomain.com/post-name (without the blog part). The blog path is also added to the other pretty permalink structures as well, not just to the one with the post name. If you don't use pretty permalinks for your main site but the default structure (e.g. yourdomain.com/?p=21), then nothing is added to the URLs of posts. This URL change applies only to the main site and not to the other sites in the network. Nothing is added to the URLs of static pages. If you have set up your multisite to use subdomains for the sites in the network, no such automatic URL change is made to the URLs of the main site's posts.
If your multisite is configured to use subdirectories for the sites in the network and you add a site with a path that's the same as the slug of an existing static page on the main site, then the page will not be accessible. For example, your main site is yourdomain.com and on that site you have a static page with the slug sample-page (making its URL yourdomain.com/sample-page). If you add a site in the network with the path sample-page (making the URL of the site yourdomain.com/sample-page), then after the site is created the page will no longer be accessible. In this case you can choose another path for the site or you can go to the admin panel of the main site, edit the page and change its slug.
For general information on permalinks check out the tutorial on how to manage permalinks in WordPress.
Network Settings
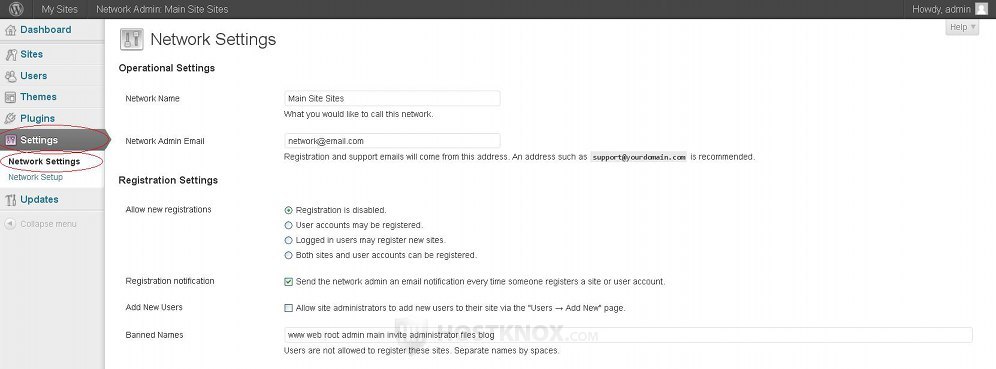
In the network admin panel there are some settings that are not present in the admin panels of individual sites. To access and configure them, in the network admin panel go to Settings menu>Network Settings sub-menu. On the page that opens you'll see many options related to the multisite network:
For a detailed review of all these settings read the tutorial on how to manage the network settings in WordPress multisite.
Network Upgrades
Before upgrading your WordPress make sure you have a recent backup of the files and the database.
When a new WordPress version becomes available you can upgrade your whole network from the network admin panel. As with a single-site WordPress installation you'll be informed with a message on a yellow background displayed at the top of the dashboard:
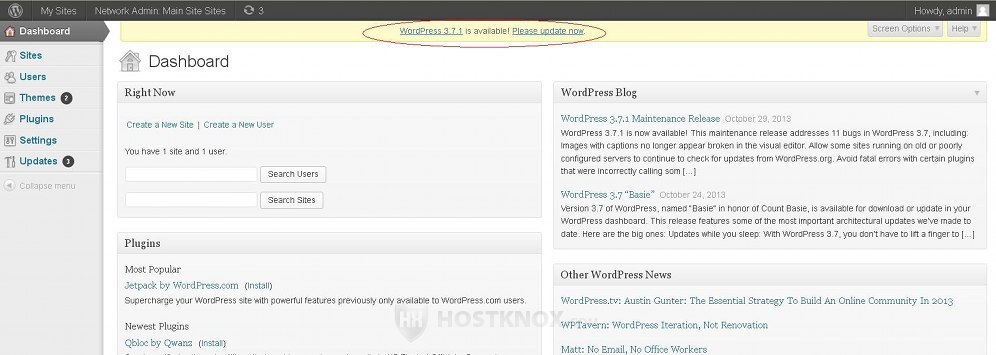
The message will be shown at the top of the network admin panel and also at the top of the admin panel of each site in the network. The upgrade itself however is performed from the network admin panel.
If there are new versions of any of the themes or plugins you've installed this will be indicated respectively with a number next to the Themes and Plugins sections. Next to the Updates menu on the left side of the network admin panel you'll also see a number showing the items for which there are new versions (that includes the whole application itself and themes and plugins).
To upgrade the application and/or any of the themes and plugins click on the Updates menu in the network admin panel. To upgrade the whole application click on the Update Now button that's on the page that opens:
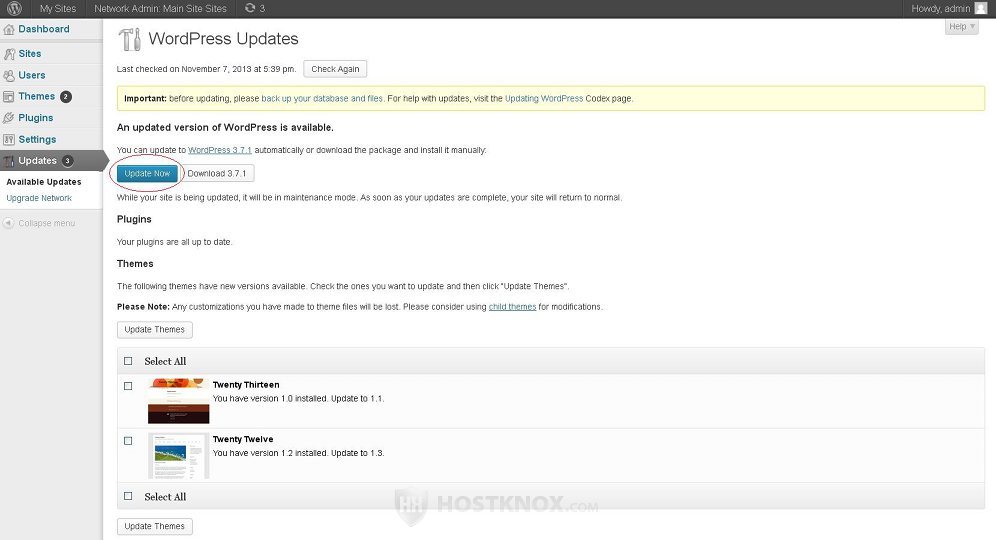
WordPress will automatically download the new version and it will upgrade your files. You'll see a message informing you that the upgrade is successful.
After that you have to upgrade the database. To do this, in the network admin panel go to Updates menu>Upgrade Network sub-menu and on the page that opens click on the Upgrade Network button:
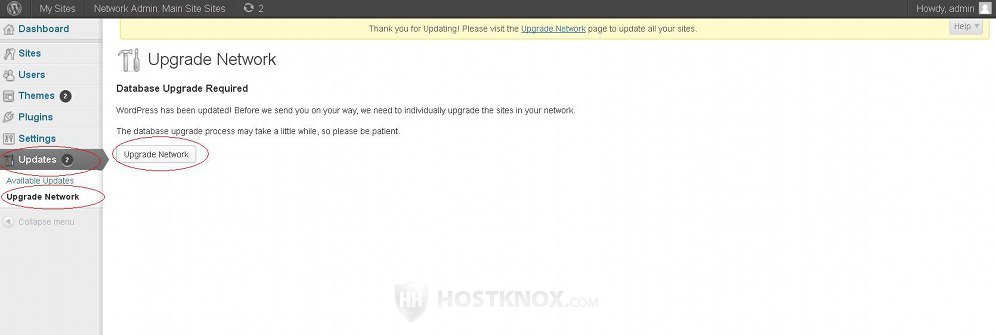
After that is done your network will be upgraded.
By going to Updates menu>Available Updates sub-menu in the network admin panel you can also update themes and plugins. Just mark the checkbox for the theme(s) and/or plugin(s) that you want to update and click respectively on the Update Themes or Update Plugins button, depending on whether you're updating themes or plugins.
You may also find useful the following tutorials on WordPress multisite: